Documentation
EchoAI is a premium AI chat assistant that integrates seamlessly with the Sngine social network. It transforms any Sngine website into an AI‑powered community where users can chat with an intelligent assistant, generate images, save memories, and more – all powered by a flexible token‑based credit system.
Plug & Play
No Sngine core modifications. Installs as a standalone module and uses Sngine's existing user system.
Monetization Ready
Built‑in token system with flexible pricing models – charge per message, per character, or per image.
Multi‑Language
Supports multiple languages out of the box – English, Greek, German, and more can be added.
Secure & Auditable
Full admin audit logs, user blocking, content filtering, and rate limiting included.
EchoAI can be installed in under 5 minutes. Follow the Installation guide below.
System Requirements
Before installing EchoAI, ensure your server meets the following requirements.
| Component | Minimum | Recommended |
|---|---|---|
| Operating System | Linux (Ubuntu 20.04+, CentOS 7+) | Linux (Ubuntu 22.04 LTS) |
| Web Server | Apache 2.4+ or Nginx 1.18+ | Nginx + Apache (reverse proxy) |
| PHP Version | 7.4 | 8.1 or 8.2 |
| PHP Memory Limit | 256M | 512M |
| MySQL / MariaDB | MySQL 5.7 / MariaDB 10.3 | MySQL 8.0 / MariaDB 10.6+ |
| Disk Space | 500 MB (base) | 5 GB+ (for images & logs) |
| RAM | 1 GB | 2 – 4 GB |
| CPU | 1 Core | 2+ Cores |
| Extension | Purpose |
|---|---|
curl | Making API calls to DeepSeek / OpenAI |
json | Parsing API responses |
mysqli | Database connection |
mbstring | Multi‑byte string handling (UTF‑8, emojis) |
zip | Update manager (ZIP extraction) |
gd | Image processing |
openssl | Secure API connections |
fileinfo | File upload validation |
You need at least one of these to enable core AI functionality:
- DeepSeek – Text generation (chat, reasoning), Video Analysis, and Image Recognition – Get key
- OpenAI – Text generation (alternative), Video Analysis, and Image Recognition – Get key
- OpenAI – Image generation (DALL‑E) – optional
Optional keys, required only if you enable the matching feature:
- OneSignal App ID + REST API Key – only needed for Push Notifications – Get key
- PayPal Client ID + Secret – only needed if you enable PayPal in Payments – Get key
- Telegram Bot Token – only needed for the Telegram announcement bot system (Admin → Content/System) – create one via @BotFather
EchoAI requires HTTPS for secure API communication. Use Let's Encrypt (free) or a commercial certificate.
- Sngine 4.0+ installed and accessible
- Sngine packages table must have
thinking_mode_allowedandmemory_limitcolumns (the installer adds them automatically)
Installation Guide
Follow these steps to get EchoAI up and running on your Sngine site. Each step below includes the most common thing that trips people up, based on real support tickets.
Step 1 – Upload the Files
Upload the EchoAI.zip folder to the root of your Sngine directory (e.g., /public_html/). Extract the archive so you have a folder like /echoai/ or /covenai/.
- You can install EchoAI at any subfolder name you like (
/echoai/,/ai/,/covenai/— it's all detected automatically at runtime, no hardcoded paths). - Use your host's File Manager (cPanel, Plesk, HestiaCP) or an FTP/SFTP client (FileZilla) to extract the ZIP directly on the server — this is far faster and more reliable than extracting locally and re-uploading thousands of small files one by one.
- Make sure the extraction didn't create a nested duplicate folder (e.g.
/echoai/echoai/) —installation.phpshould sit directly inside your chosen folder.
Step 2 – Run the Installer
Navigate to https://yourdomain.com/echoai/installation.php in your browser.
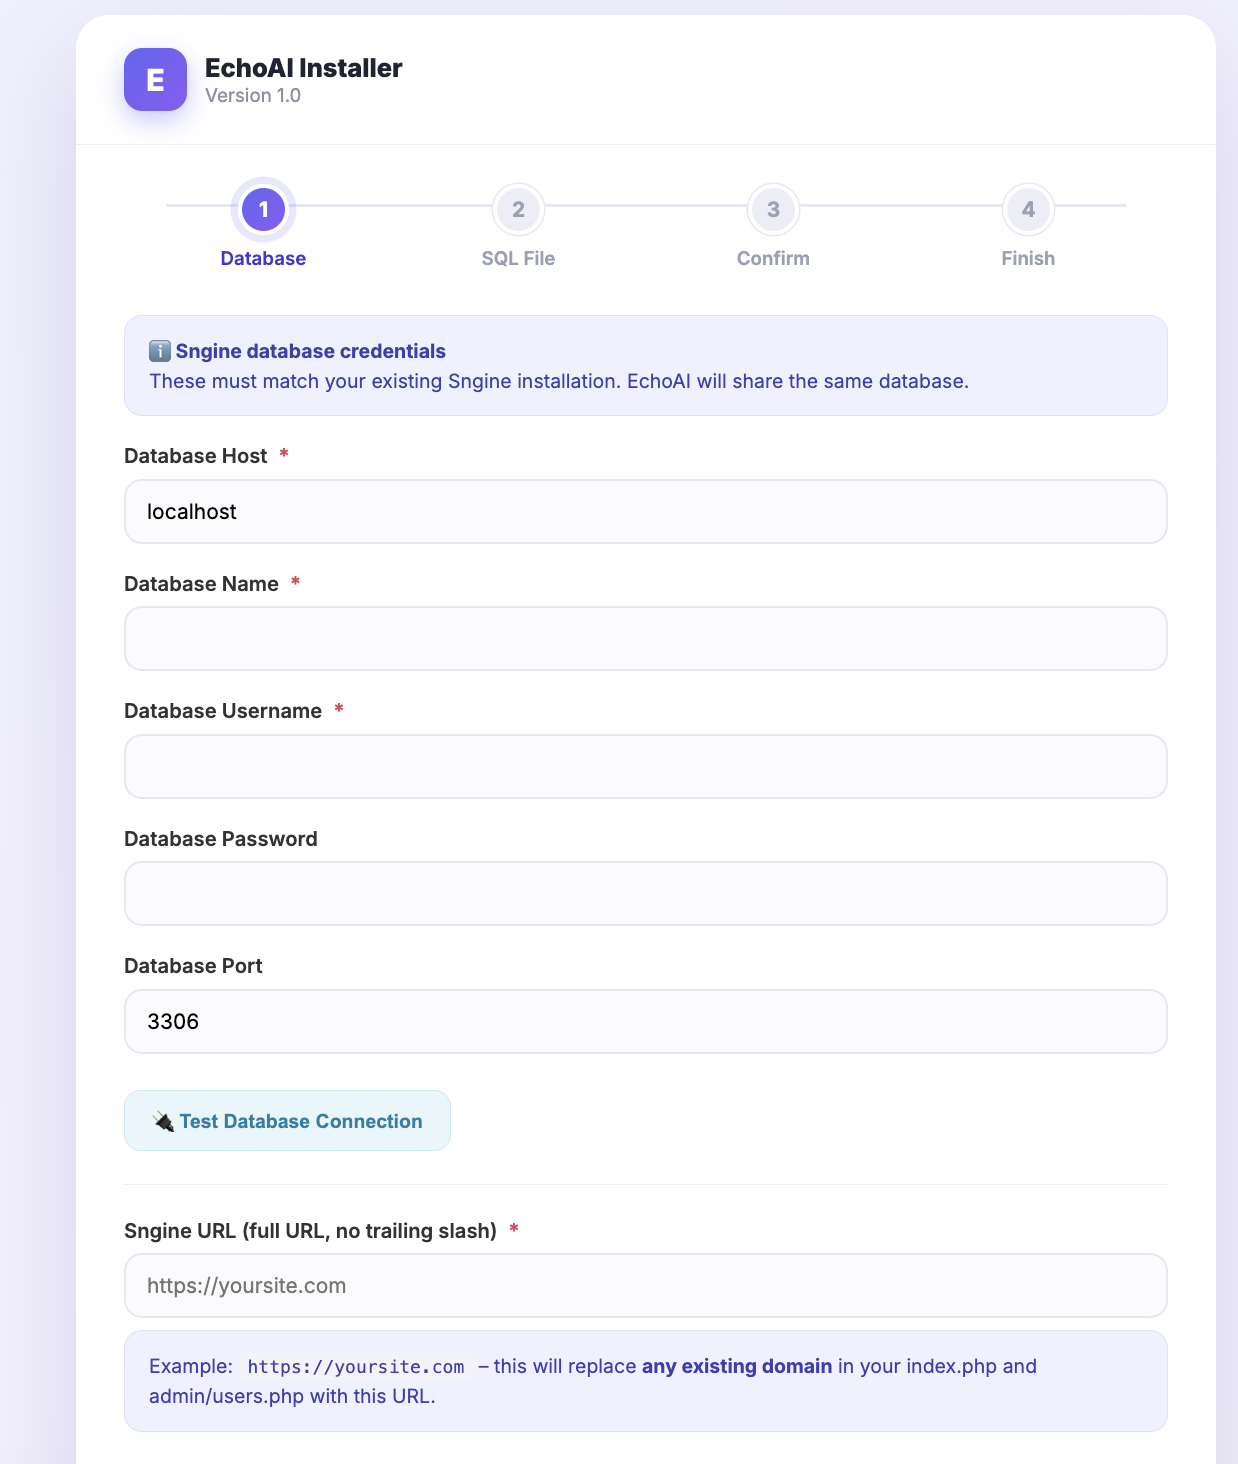
You will see the installation wizard:
- Step 1: Enter your database credentials (same as Sngine). Click "Test Database Connection" to verify.
- Enter your Sngine URL, AI name (e.g., "EchoAI"), and the theme path (e.g.,
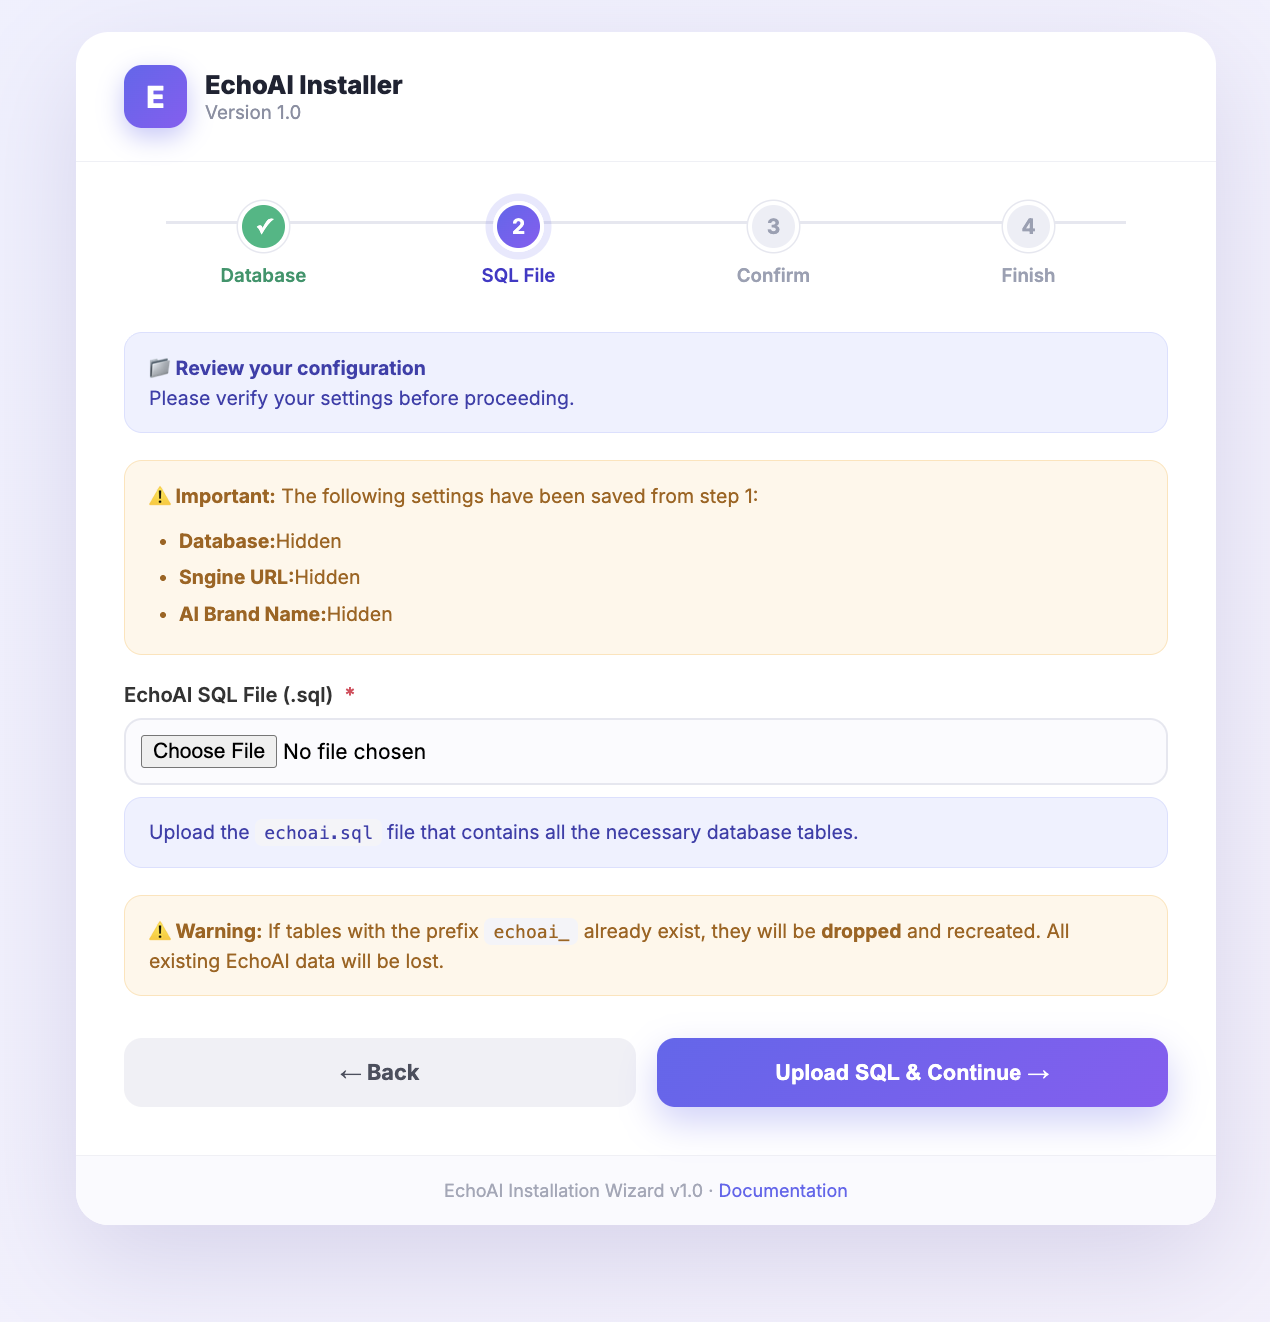
content/themes/default). - Step 2: Upload the
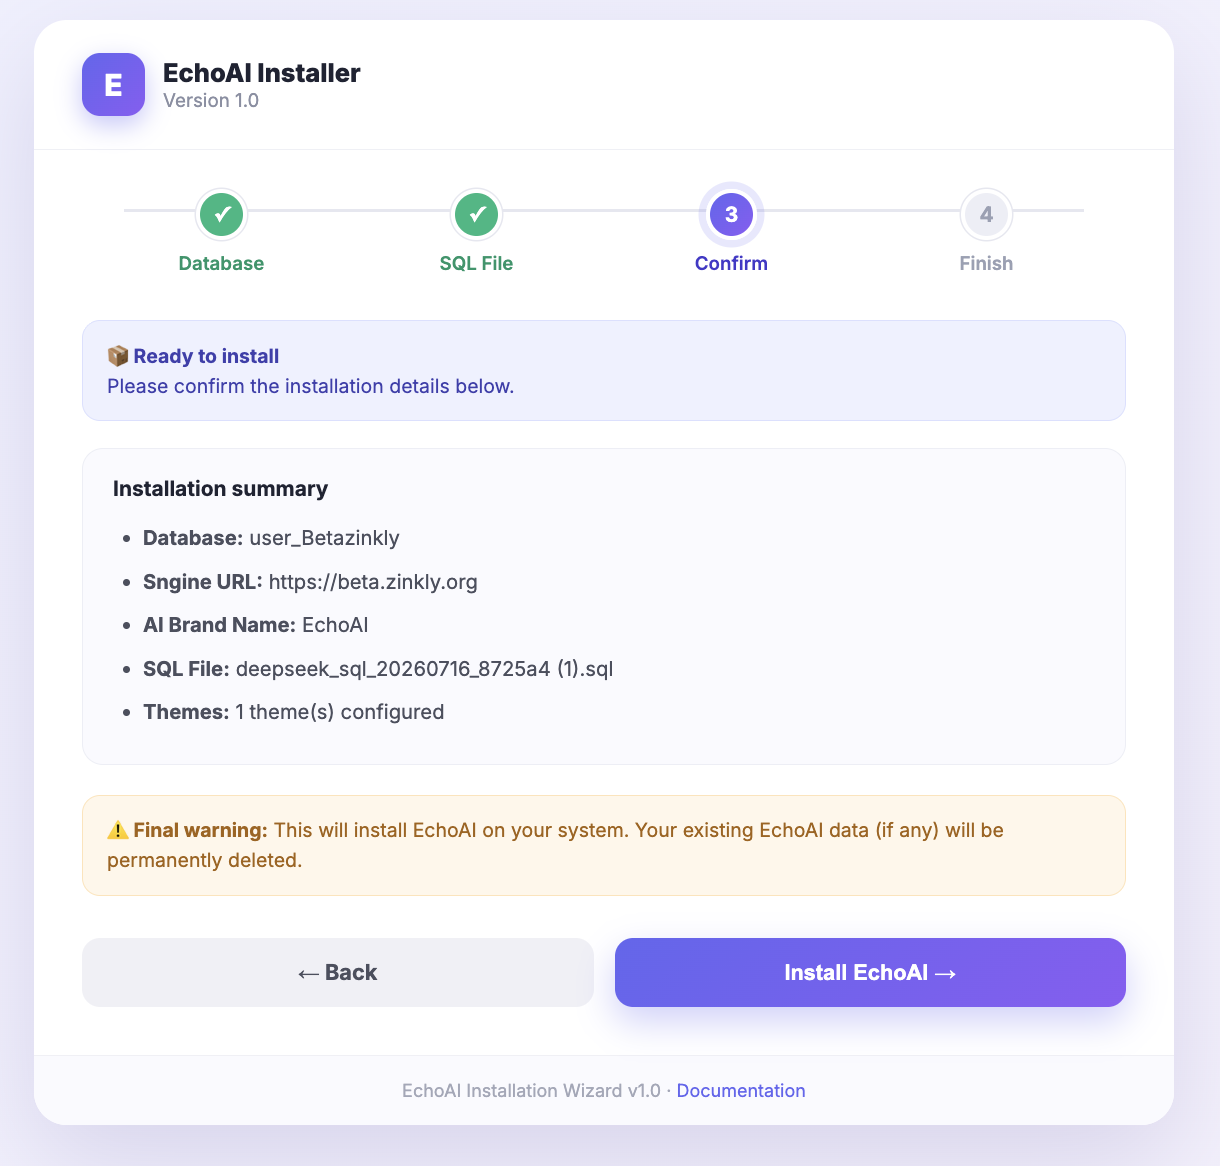
echoai.sqlfile (included in the purchase package). - Step 3: Review the installation summary and click "Install EchoAI".
Click the Test Database Connection button – if everything is set up correctly, you will get a success message; if not, you will see an error to help you troubleshoot. This must use the same database as your Sngine install — EchoAI reads Sngine's
users table directly rather than keeping a separate copy of your members.
The theme path you enter here is only used to auto-detect your avatar folder during setup — it does not lock EchoAI to that theme. You can change themes later without reinstalling.
Step 3 – Post‑Installation
- Set up the avatar: Copy
/echoai/avatar.jpgto/content/themes/default/images/avatar.jpg(or your active theme's images folder). - Configure API keys: Go to the admin panel → API Keys and add your DeepSeek / OpenAI keys, then use the built-in Test Connection button next to each one before moving on — this confirms the key is valid before your users ever see an error.
- Set up cron: Add the daily token reset cron job (see the Cron Jobs section) — the token system silently stops resetting balances without it.
- Set up push notifications (optional): If you want users to get a browser notification when a background task like image generation finishes, follow the Push Notifications guide.
- Set up a payment provider (optional): If you plan to sell paid packages, configure PayPal and/or the custom bank-transfer provider — see the Payments section.
If you face issues with default icons and the AI cannot show them, update the avatar path in
/echoai/index.php around line 251 to point to your active theme's images folder. This ensures the AI avatar displays correctly with your custom theme (e.g., Elengine, Xngine).
🔄 Re‑Installation
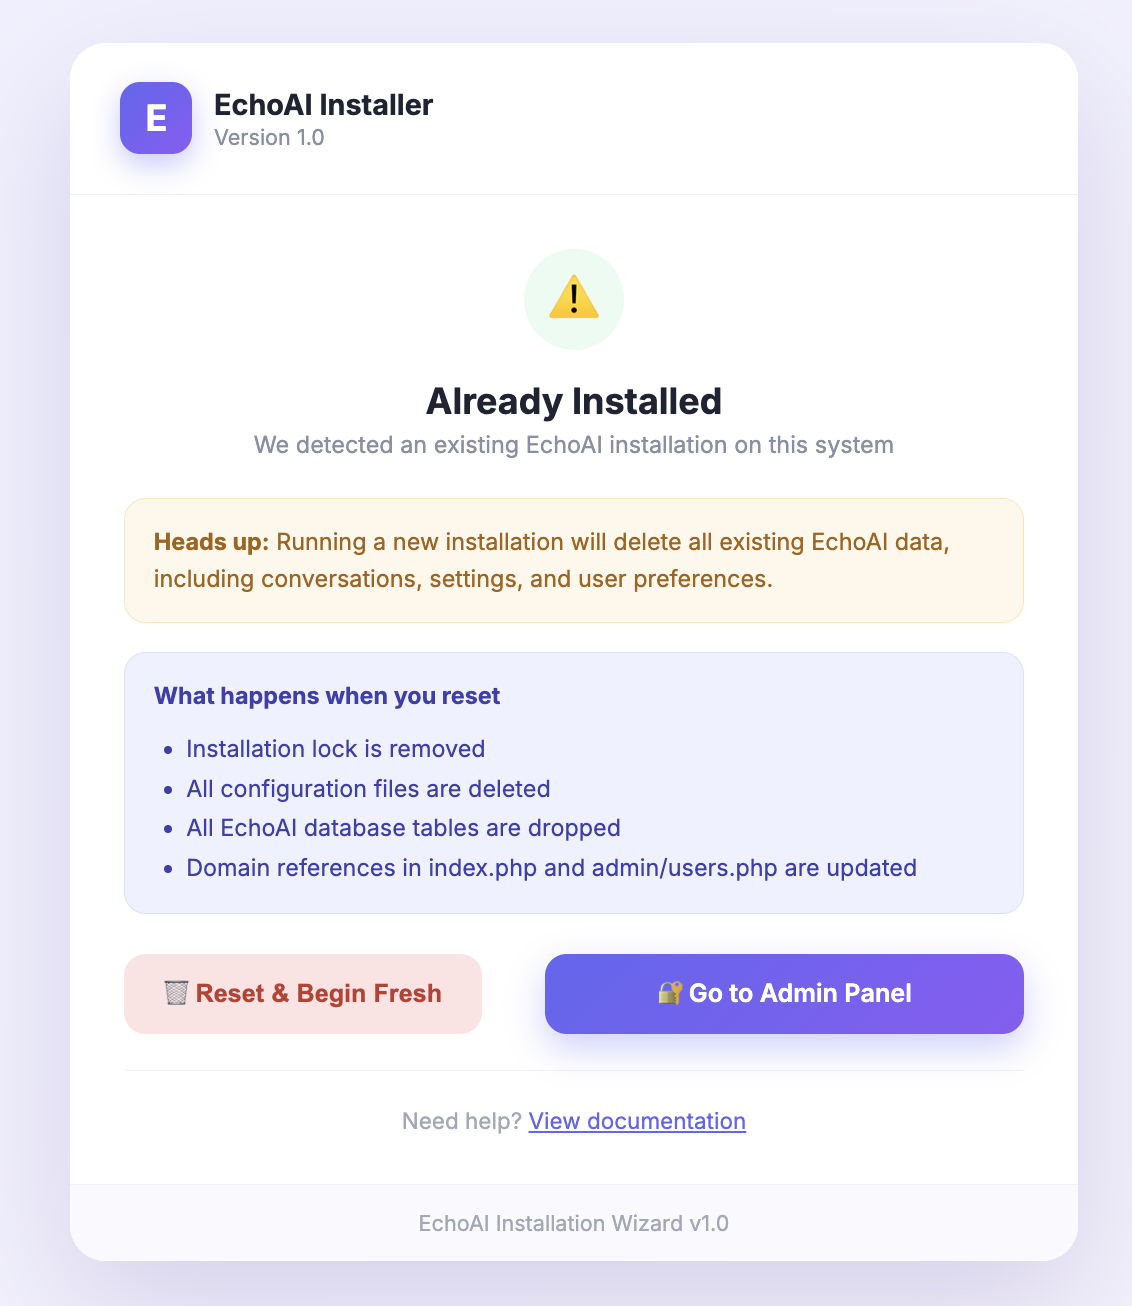
EchoAI gives admins the ability to wipe everything (including the database) and start fresh whenever needed.
- Simply navigate again to
https://yourdomain.com/echoai/installation.php - Click the 🗑️ Reset & Begin Fresh button
- Follow the installation wizard from the beginning
For security reasons, we strongly recommend renaming
installation.php to something less predictable (e.g., inst.php) after your initial setup. This prevents unauthorised access to the reset functionality.
🛠️ Troubleshooting a Fresh Install
| Symptom | Most likely cause |
|---|---|
White/blank page on installation.php | PHP error display is off. Temporarily set display_errors = On in php.ini, or check your host's PHP error log. |
| "Test Database Connection" fails | Double-check host, username, password, and database name — these are almost always the same values already used in Sngine's own includes/config.php. |
| Chat interface loads but styling looks broken | Usually a caching layer (Cloudflare, LiteSpeed Cache, browser cache) serving an old version — hard refresh (Ctrl/Cmd+Shift+R) and purge any CDN cache. |
| Avatar shows as a broken image | The avatar file wasn't copied to your active theme's images folder, or the path in index.php needs updating for a custom theme — see Step 3. |
| "Unauthorized" in the admin panel even though you're logged in | Your Sngine account needs user_group = 1 (site admin) or EchoAI's own user_role = 1 flag — see the Users section. |
AI Chat New
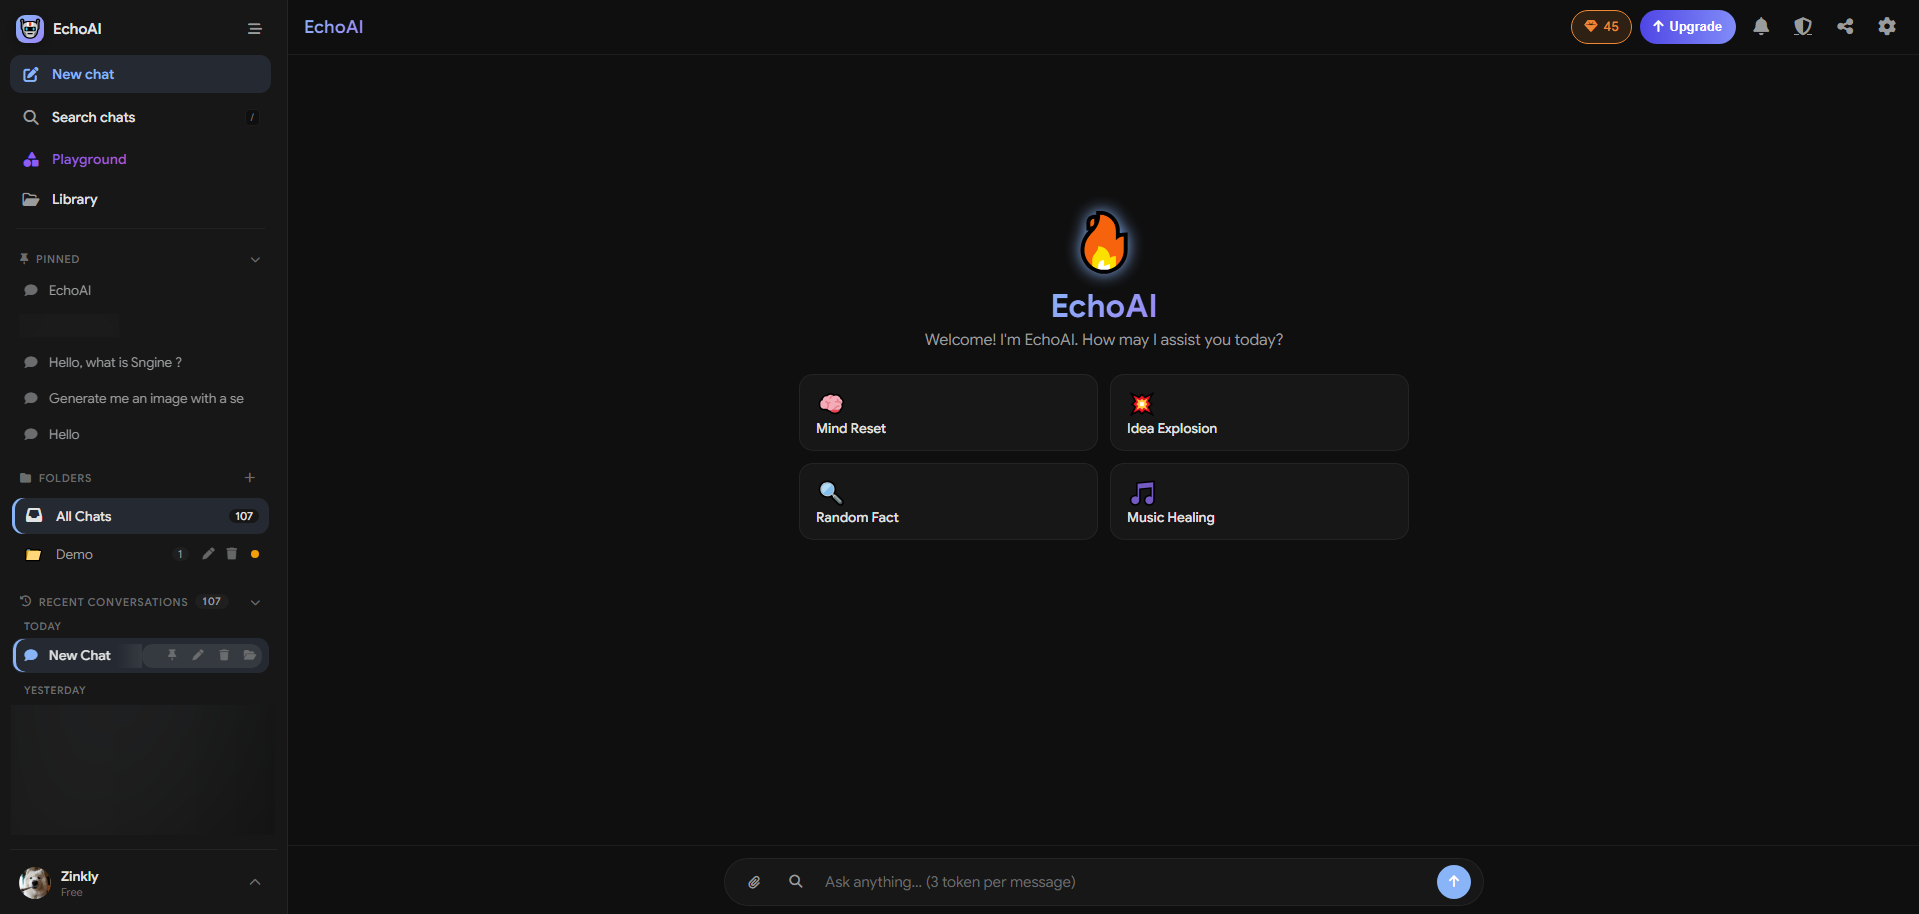
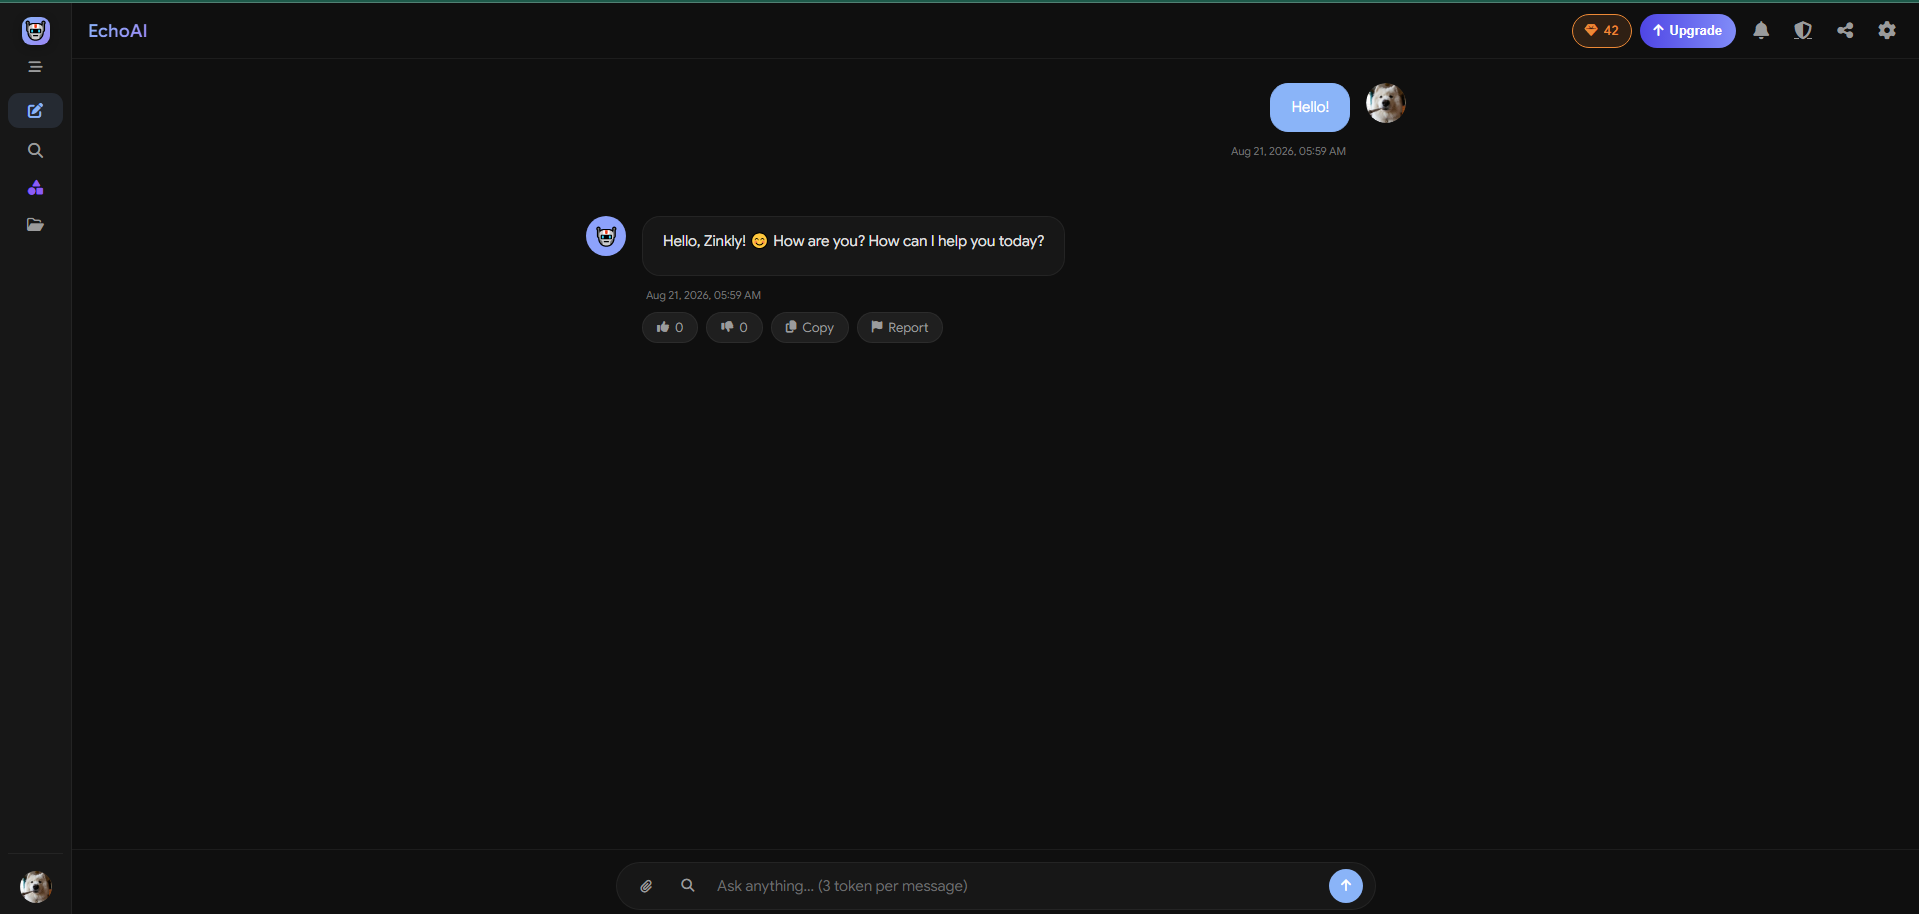
The core of EchoAI – a powerful, real‑time conversational AI experience.
Key Features
- Real‑time streaming – responses appear character by character (DeepSeek).
- Thinking Mode – enables DeepSeek's reasoning engine, showing live reasoning steps with a timer.
- Multi‑language responses – auto‑detects the user's language and replies accordingly.
- Code block minimap – VS‑Code‑style minimap for long code snippets.
- Image generation – integrated with OpenAI DALL‑E or DeepSeek (text description).
- File & image uploads – attach a photo, PDF, or document via the paperclip button. The file stages as a small preview above the message box, so you can add a caption (or send it as-is) before it ever posts — nothing is sent the moment you pick a file. Sending an image with a caption gets a real AI reply, the same as a normal message.
- Stop Generating – cancel a response mid-stream with one click.
- Time-aware responses – the AI knows the current date and time, so it can answer things like "what day is it" or reason about recency correctly.
- Time-zone conversion New – EchoAI detects each user's browser time zone and now actually uses it: ask "what time is 15:30 UTC for me?" and get a real, computed local time back – not a guess.
- Scope Restriction New – admins can confine the assistant to a specific set of topics (e.g. a single game or product) using a real AI classification call rather than keyword blocking. See AI Management.
- Hero / Unit Combos New – admin-curated pairing data grounds tactical/combo questions in verified answers instead of an improvised one. See AI Management.
- Troop / Unit Calculator New – admins enter real per-level resource costs and players get exact training/upgrade calculations computed on the server, never guessed by the AI. See AI Management.
- Upload Chats Coming Soon – import conversations from other platforms.
Thinking Mode
When Thinking Mode is enabled (per package permission), the AI shows its reasoning process before delivering the final answer. This is perfect for complex queries where transparency builds trust.
Admins can set the additional token cost per request in Settings → Costs & Tokens.
Token & Pricing System
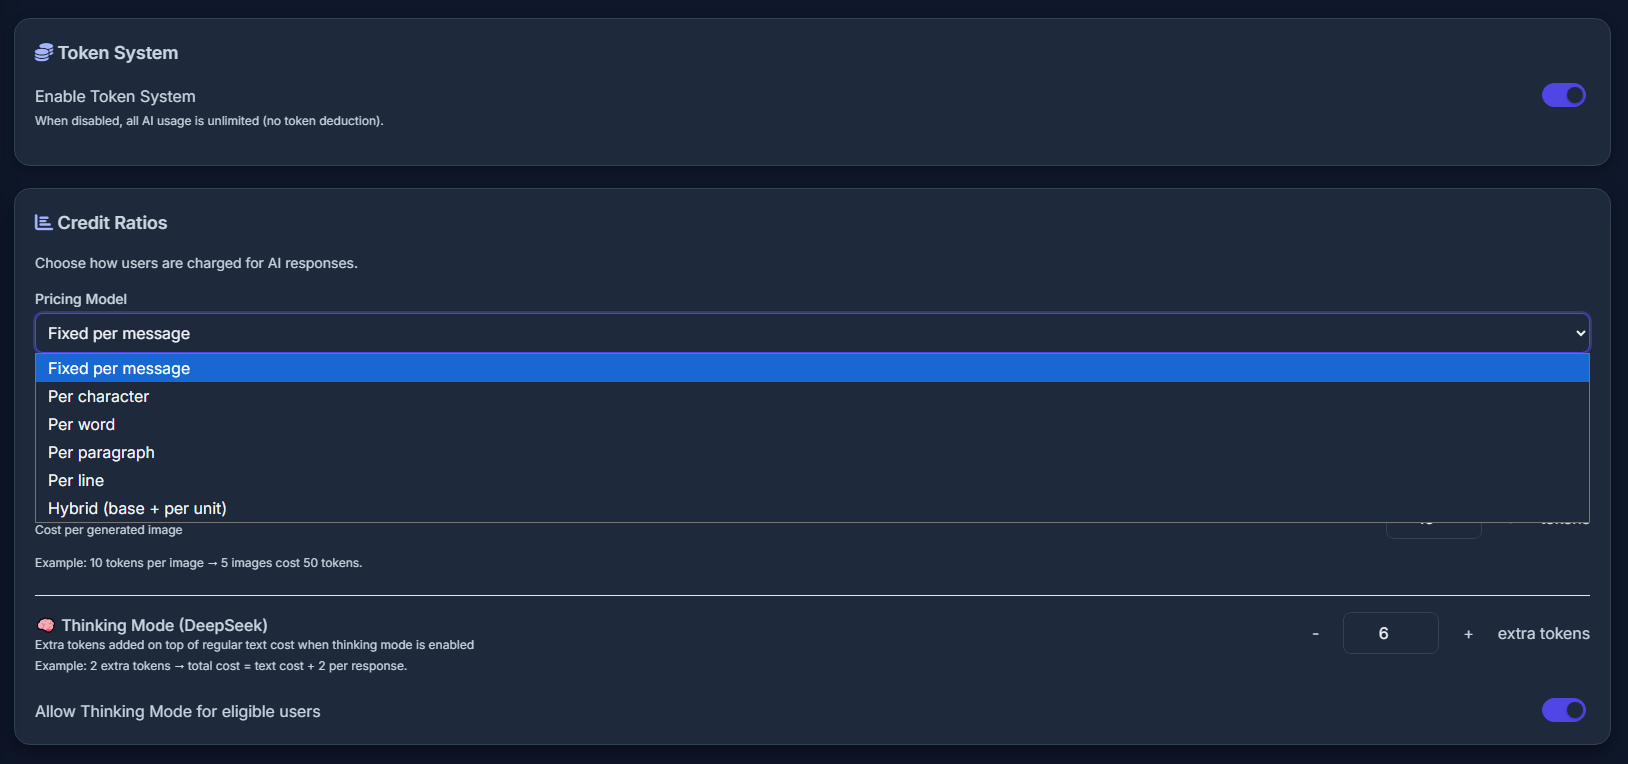
EchoAI includes a flexible, monetizable token system that gives you full control over pricing.
Pricing Models
| Model | Description | Best For |
|---|---|---|
| Fixed | Fixed cost per message (e.g., 1 token per message) | Simple, predictable pricing |
| Character | Cost per character in the AI's response | Long‑form content |
| Word | Cost per word in the AI's response | Detailed responses |
| Paragraph | Cost per paragraph | Structured answers |
| Line | Cost per line (approx. 60 characters) | Code or poetry |
| Hybrid | Base cost + per‑unit cost (character/word/etc.) | Flexible, balanced pricing |
Package Management
Admins can create and manage token packages from the admin panel → Packages. Each package includes:
- Tokens – the initial token balance
- Daily / Weekly / Monthly Limits – usage caps per period
- Reset Period – daily, weekly, or monthly token reset
- Thinking Mode – enable/disable for this package
- Memory Limit – max memory entries per user
A daily cron job automatically resets user tokens and usage counters based on their package settings.
Memory System
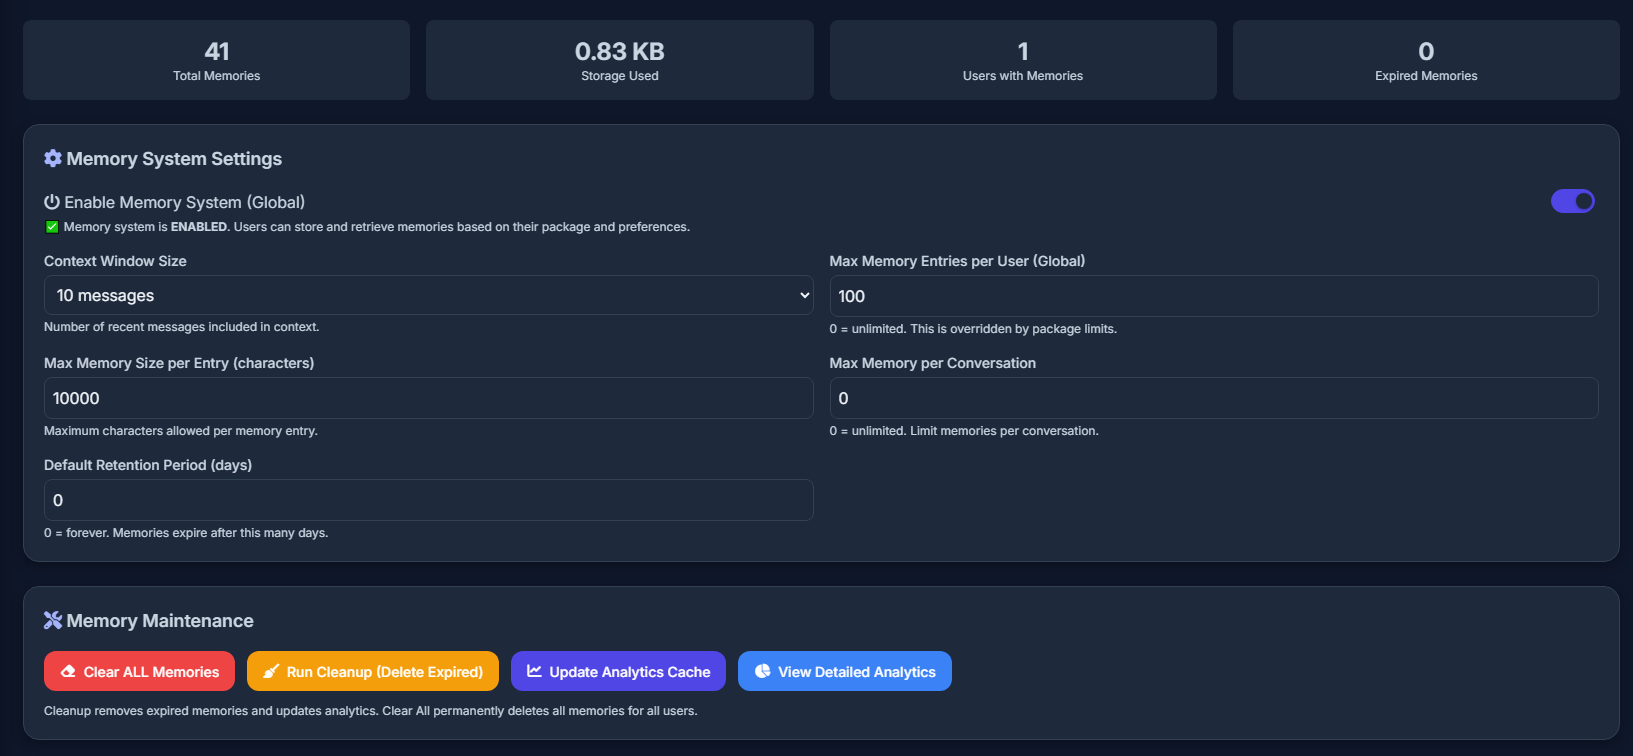
EchoAI remembers important facts about users, creating a personalised experience across conversations.
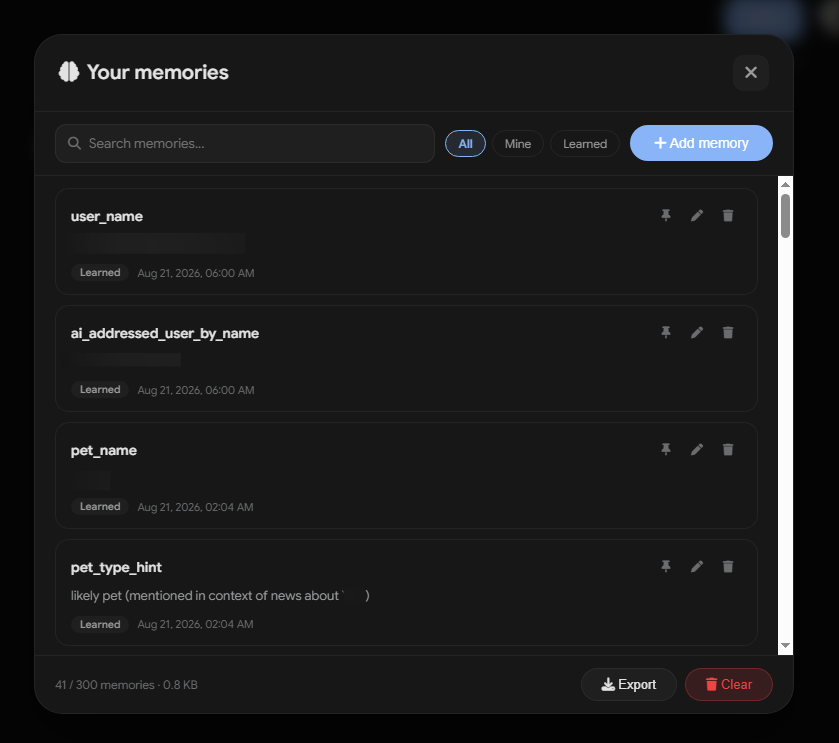
Features
- Per‑conversation memory – AI remembers facts within a specific chat.
- Global memory – if enabled, the AI remembers across all conversations.
- Memory limits – per‑user, per‑entry, and per‑conversation limits.
- Package‑based memory limit – premium packages can have more memory entries.
- Import / Export – admins can export memories as JSON.
Admin Controls
- Clear all memories
- Clear memories for a specific user
- View memory usage statistics
Personality System
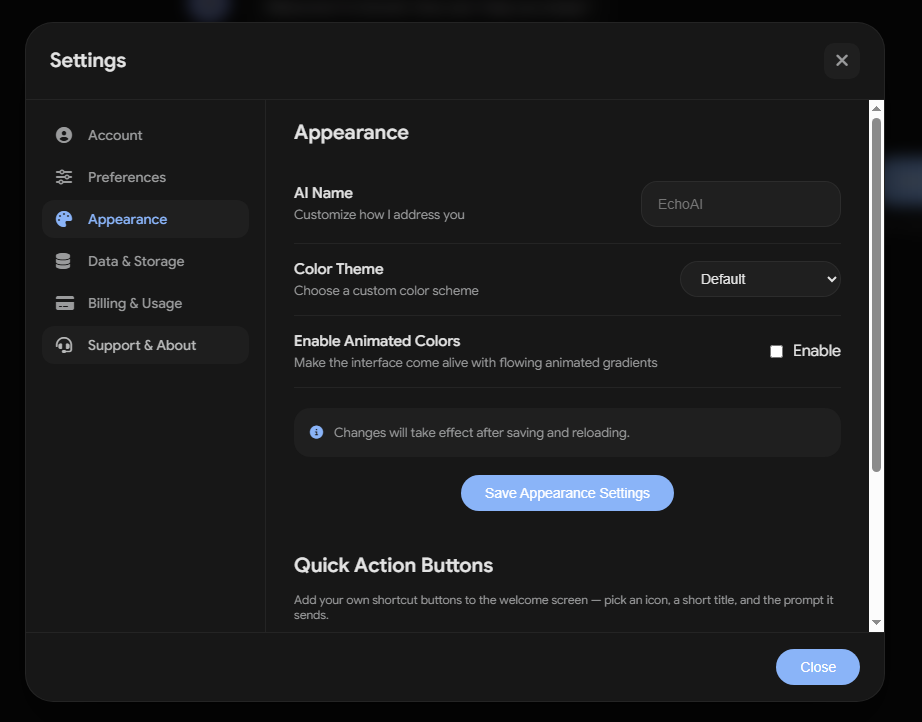
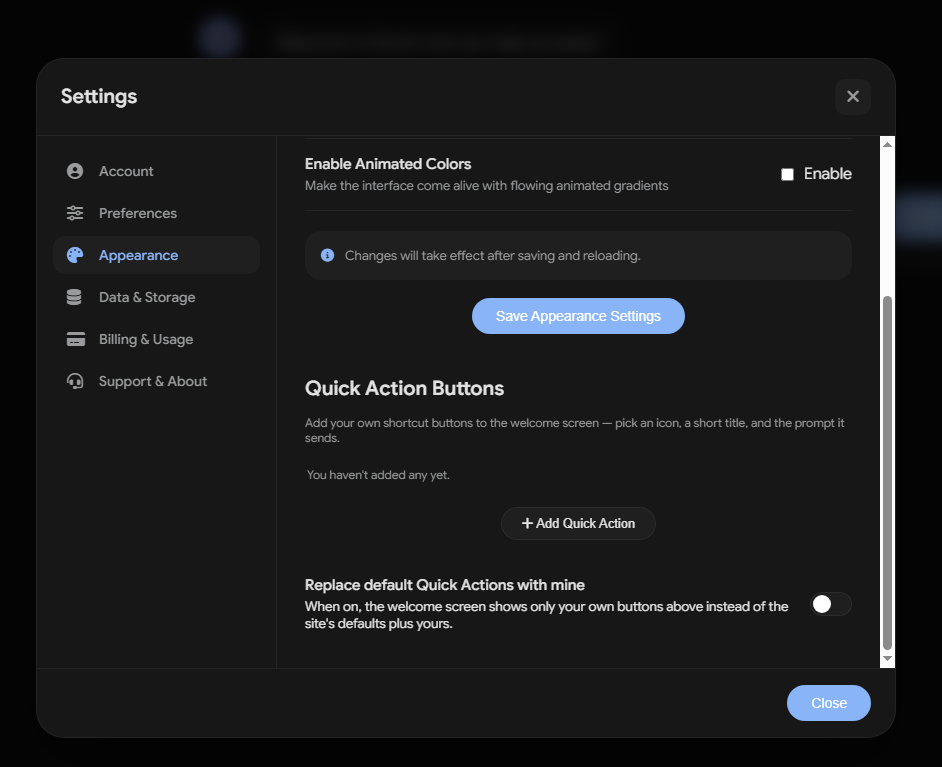
Allow users to customise their AI experience – available to selected packages.
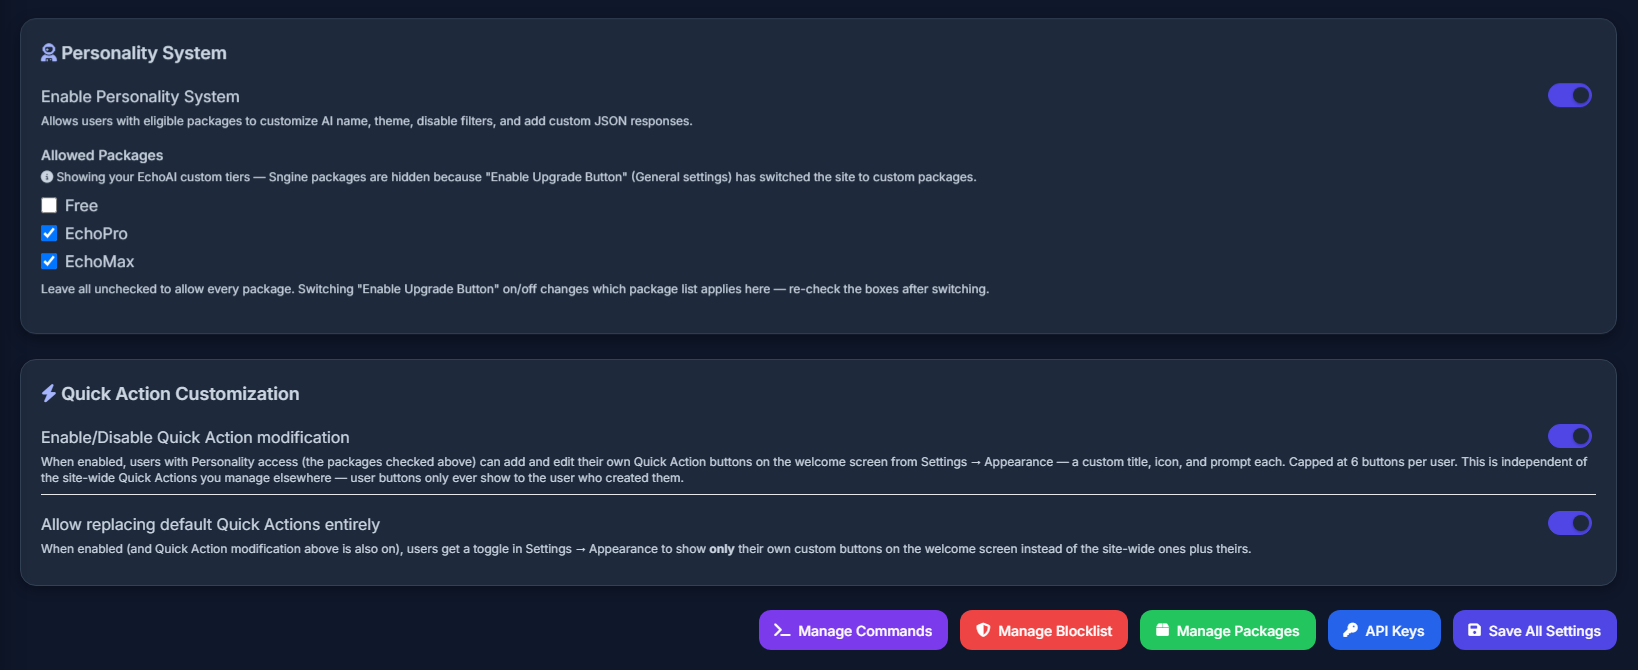
What Users Can Customise
- AI Name – give the AI a custom name
- Color Theme – choose from 9 themes, including animated colours
- Background URL – set a custom background image
- Disable Filters – bypass the blocklist (if allowed by admin)
- Custom JSON Responses – trigger‑based custom replies
- URL Mask – generate a custom URL for your AI persona (e.g.,
yourdomain.com/ai/yourname) - Quick Action Buttons – add up to 4 custom buttons that trigger predefined prompts or actions, and change or replace any button at any time.
Go to Settings → Personality to enable the system and select which packages have access.
Image Generation
Users can generate images directly from the chat interface using natural language prompts.
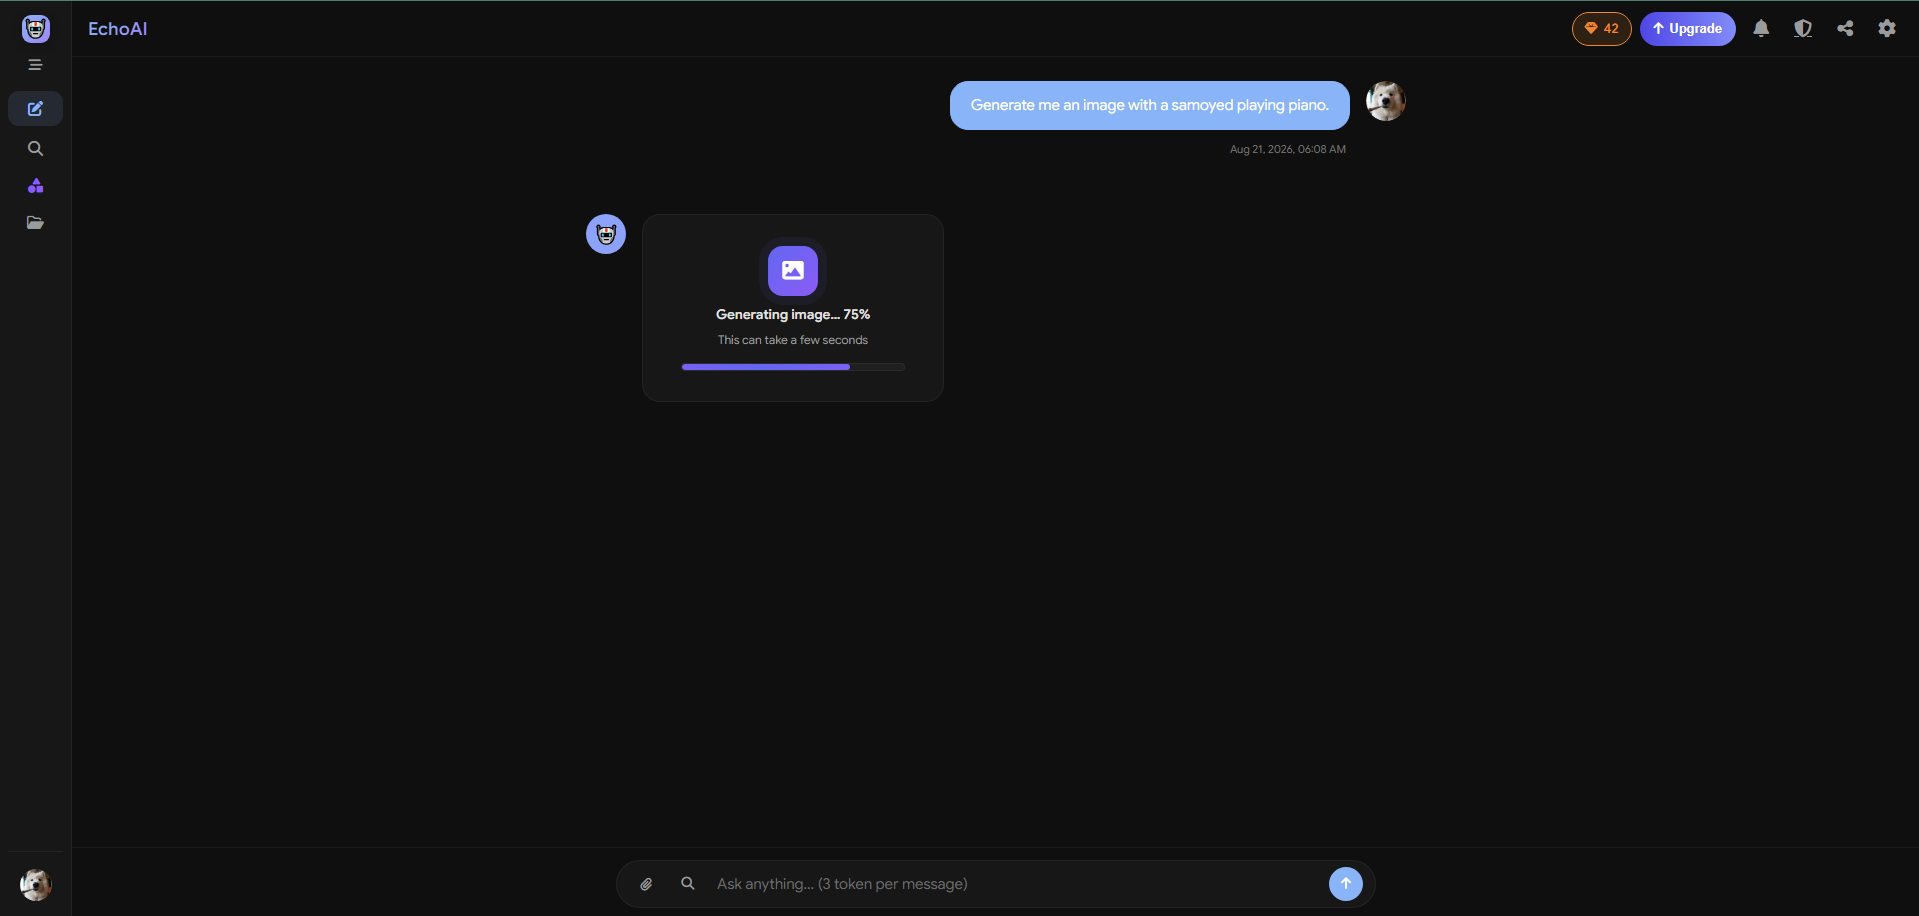
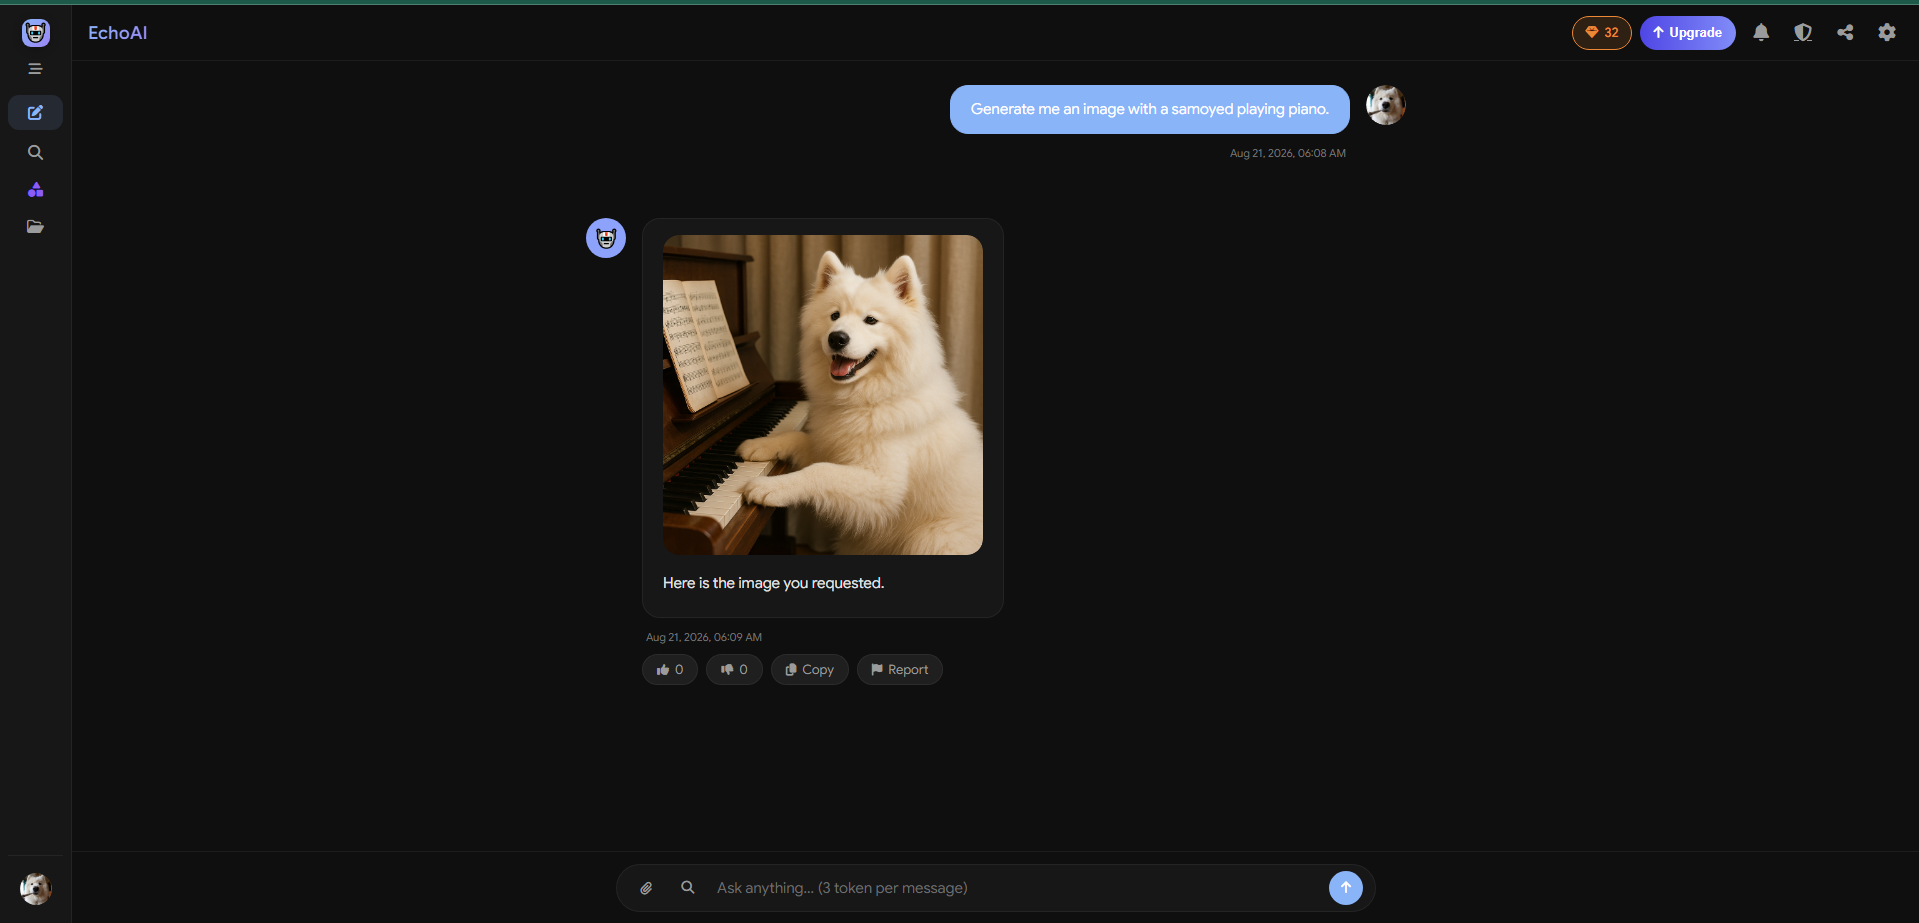
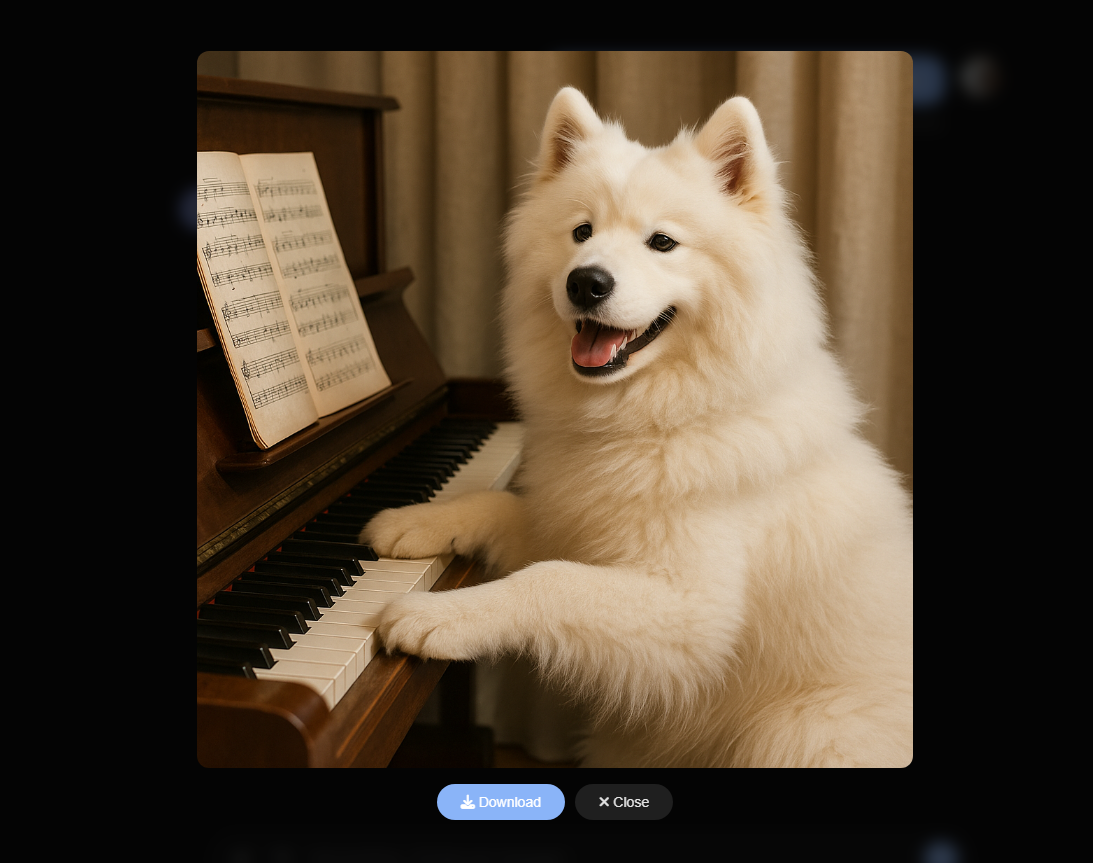
- OpenAI DALL‑E – full image generation with local caching.
- DeepSeek – generates a detailed text description of the requested image (useful for budget‑friendly setups).
- Local Storage – images are saved to disk in organised
year/month/dayfolders and served from your own server rather than a third-party link. - Duplicate Caching – identical prompts return the cached image, saving tokens.
- Push notification on completion – if OneSignal is configured, the user gets a browser notification the moment their image is ready, even if they've navigated away from the chat — see Push Notifications.
Admins can set the cost per image in Settings → Costs & Tokens.
Folder Settings
Organise your conversations like never before. EchoAI now lets users create custom folders to group chats, assign colours and emojis, and save conversations for quick access.


Create Folders
Easily create new folders from the sidebar. Give them a name, pick a colour, and choose a custom emoji to represent the folder.
Colour & Emoji
Personalise each folder with a unique colour and emoji – making it instantly recognisable at a glance.
Save Conversations
Drag conversations into folders or use the "Move to Folder" option. Keep your workspace tidy and never lose important chats.
Edit & Delete
Rename, change colour, update emoji, or delete folders at any time – your conversations stay organised.
How It Works
- Click the "+" button in the sidebar to create a new folder.
- Enter a folder name, select a colour from the palette, and choose an emoji.
- Once created, the folder appears in your sidebar. Drag any conversation into it, or use the conversation menu to move it.
- Folders are saved per user – each user has their own set of folders.
- Admins can manage folder settings globally, including limiting the number of folders per user, and set files/chats/folders to auto-delete after a chosen period (e.g. 1 week).
Use colour‑coding to differentiate work, personal, or project‑related chats. Emojis add a fun and visual touch.
In a future update, we'll add the ability to share folders with other users and set collaborative permissions.
AI Media Search
Supercharge your community by enabling AI-powered search for Sngine posts directly from the EchoAI interface.
Search Sngine Posts
Users can search for public posts (not hidden, deleted, or private) using natural language – the AI will retrieve and display them.
Direct Links
Each result includes the post content, the author's name, and a direct URL to view the post on your Sngine site.
Admin Controlled
Enable or disable this feature from Admin Panel → Settings → Enable Social Post Search. It's off by default.
Smart AI Interpretation
Simply type a query like "Posts about PlayStation 5?" and the AI will interpret it and return relevant posts.
How It Works
- When enabled, a icon appears in the chat input area.
- Click the icon to activate Search Mode – the input placeholder changes to "Search public posts...".
- Type your query (e.g., "recent updates about AI") and send. The AI will search Sngine's public posts.
- The response will include a list of matching posts with:
- Post content (snippet)
- Author – who posted it
- URL – a clickable link to the original post
- Users can then click the link to view the full post on your site.
Only public posts are searchable. Hidden, deleted, or private posts are never exposed.
This feature requires the Enable Social Post Search setting to be turned on in Admin Panel → Settings → AI Configuration. It is disabled by default.
Library
Now all images and files are automatically organised in a central Library, with a refreshed design — pill-style tabs for switching between views and clearer, more polished cards for every file and image.
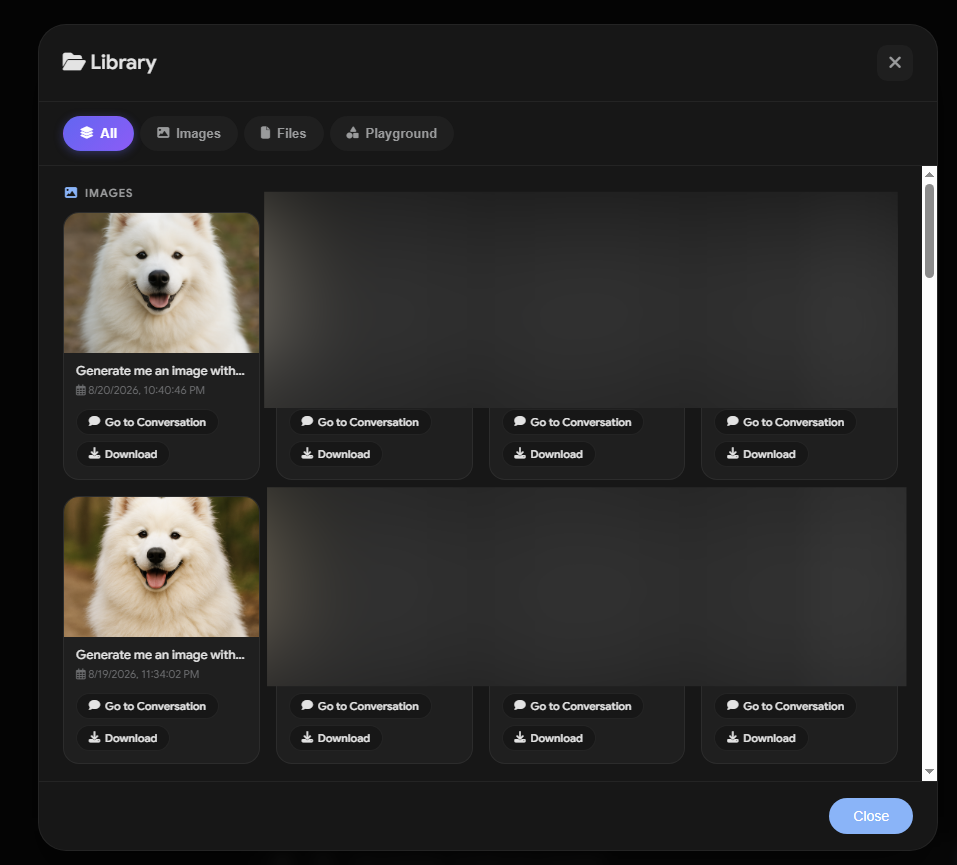
When a user generates an image or sends a file, it is automatically added to their personal library. The library offers three views:
- All – shows both images and files together.
- Images – only generated or uploaded images.
- Files – only uploaded files (PDF, DOC, etc.).
- Playground – saved Coding Playground projects, if the plugin is installed.
Users can browse, sort, and delete items from their library. This makes it easy to keep track of all generated content and uploaded documents in one place.
Files and images are stored in your server's file system with organised folders per user and date. Admins can also manage the library globally from the admin panel.
Push Notifications New
EchoAI can send a real browser push notification when something the user asked for finishes in the background — most commonly, "Your image is ready" once an AI image generation completes. Tapping the notification takes the user straight back into that conversation, even if they've closed the tab.
Push notifications are powered by OneSignal, a free push notification service. You'll need a (free) OneSignal account to use this feature.
Real Browser Push
A native OS-level notification, not just an in-app badge — it works even if the browser tab is closed.
Deep Links
Tapping the notification opens the exact conversation the content landed in.
Fully Optional
Disabled by default — the rest of EchoAI works identically whether or not this is configured.
Built-in Test Button
Send yourself a real test notification from the admin panel — no need to guess whether it's working.
Step 1 – Create a free OneSignal account and add an app
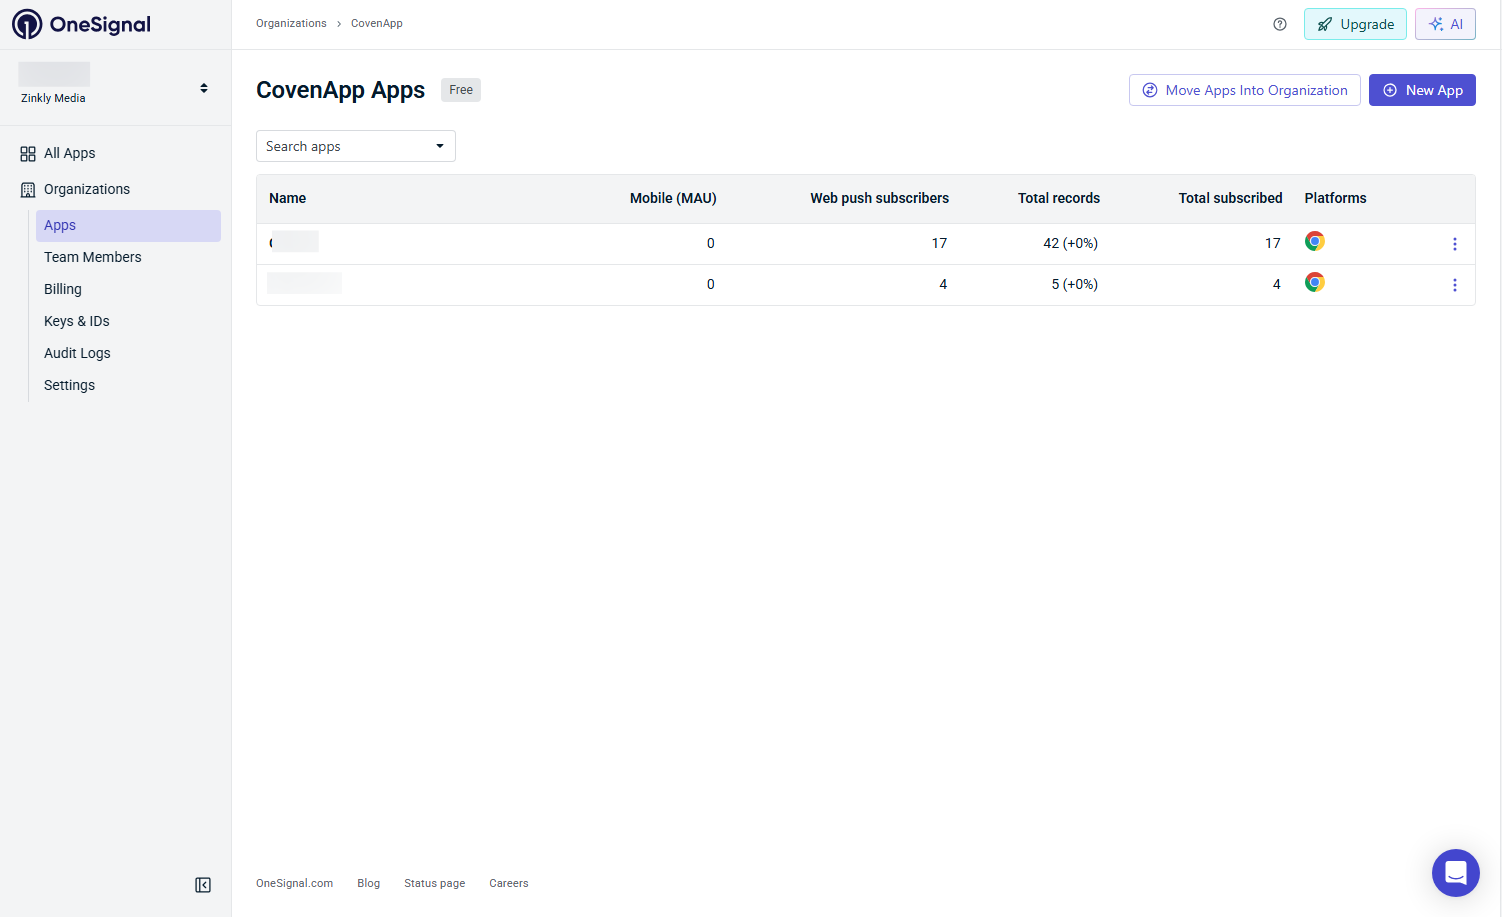
Go to onesignal.com, create an account, and log in to the dashboard.
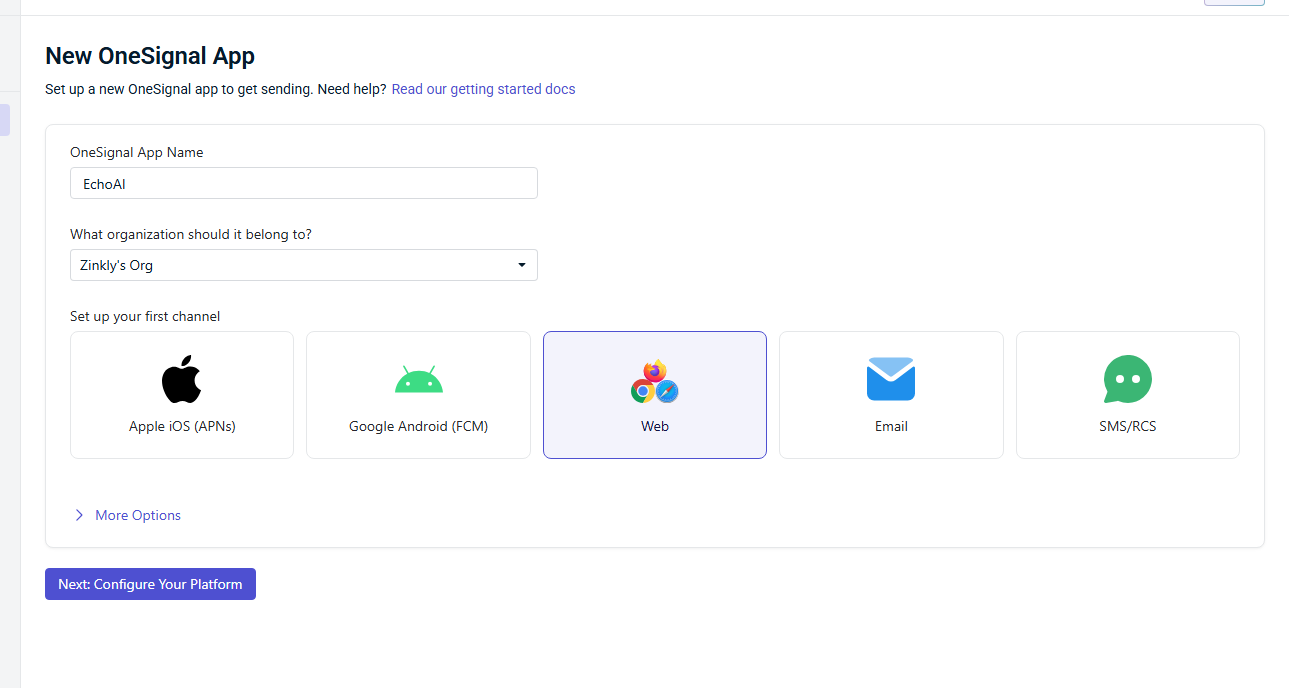
Click New App/Website, give your app a name (e.g. your site's name), and when asked to choose a platform, select Web Push.
Note: You do not need iOS, Android, or Email/SMS for this integration — Web Push is the only channel EchoAI uses.
Step 2 – Configure the Web Push setup
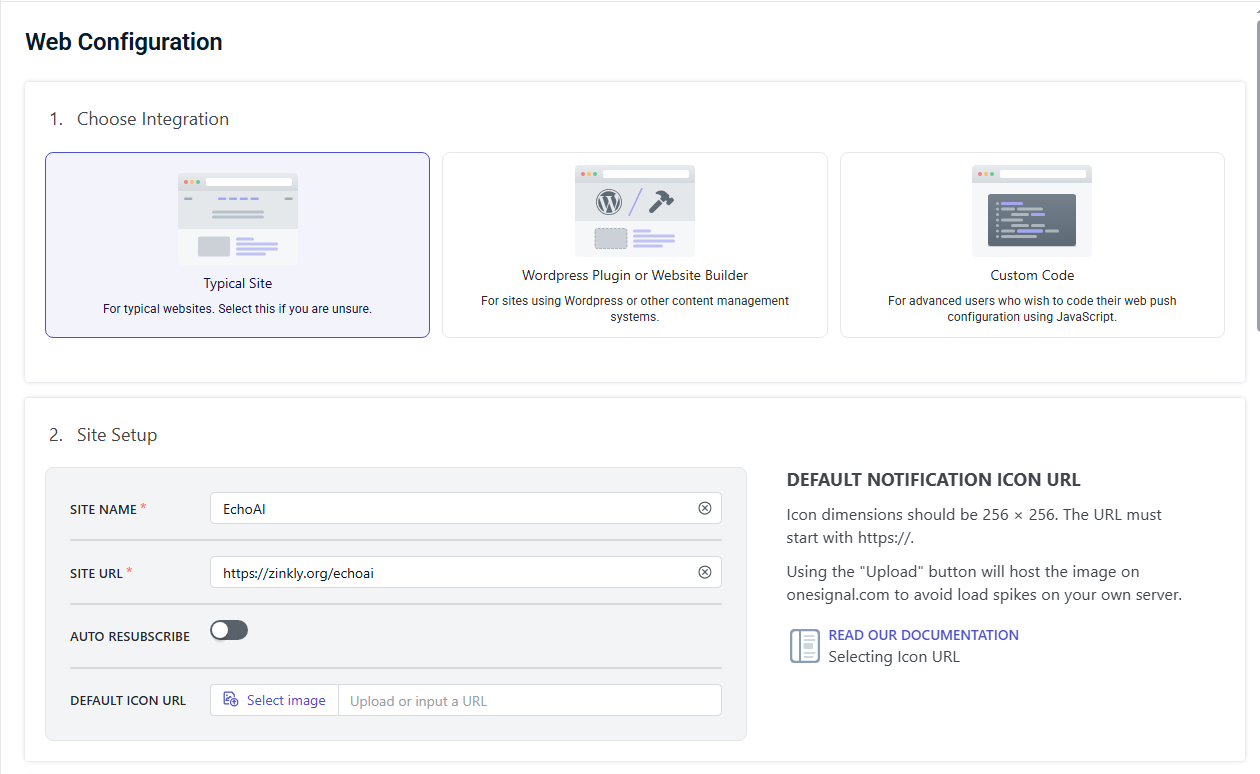
- Site Name – whatever you want shown in the browser's permission prompt.
- Site URL – your Sngine site's full URL, e.g.
https://yourdomain.com. Must match exactly (includinghttps://) or subscriptions won't register correctly. Also include your EchoAI subfolder if installed there (e.g.https://yourdomain.com/echoai) – this ensures the OneSignal service worker is served from the correct path. - Default Icon URL – optional, but recommended: point it at your site's favicon or logo so notifications look branded rather than generic.
- Leave "Choose a permission prompt" on its default (Slide Prompt or Bell) — either works fine with EchoAI.
If your EchoAI is installed in a subdirectory like
/echoai, set the Site URL to https://yourdomain.com/echoai – otherwise OneSignal's service worker may not be loaded correctly.
Step 3 – Get your App ID and REST API Key
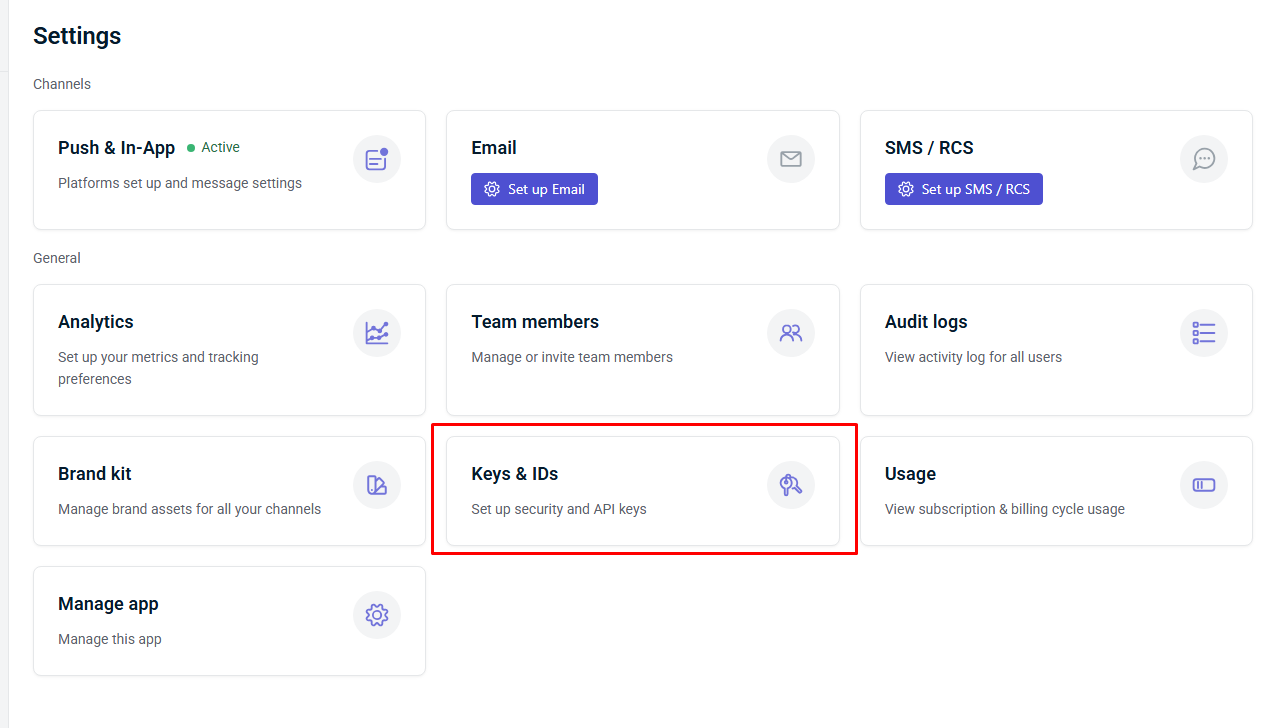
After creating the app, click Finish (or go to Settings → Keys & IDs).
- OneSignal App ID – a UUID like
8f2b1c4a-xxxx-xxxx-xxxx-xxxxxxxxxxxx. Copy this. - REST API Key – on the same page, generate or copy your REST API Key.
OneSignal has retired its old legacy API key format. Make sure you're copying the current REST API Key shown on your app's Keys & IDs page today. If your account is old and still shows a legacy-style key, click Generate New API Key first. EchoAI's push feature will silently fail if you paste an outdated key.
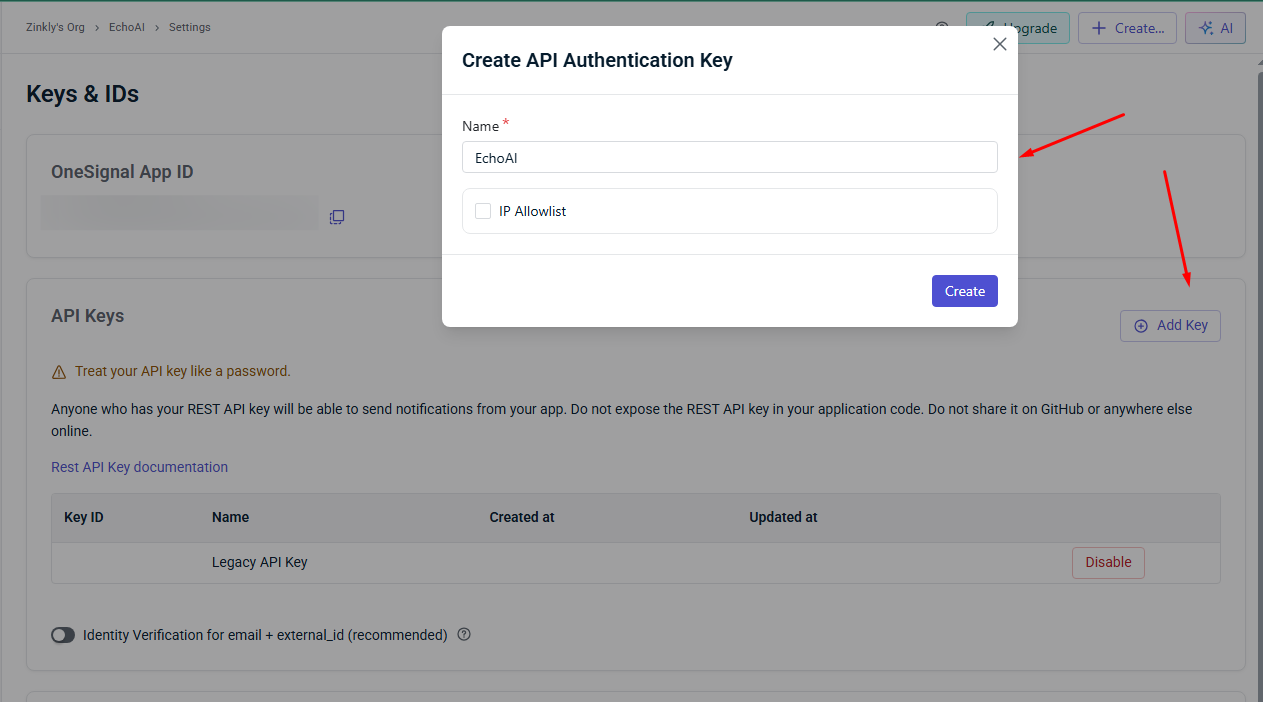
Step 4 – Paste keys into EchoAI and test
Go to Admin Panel → Settings → Notifications, check Enable OneSignal Push Notifications, paste your App ID and REST API Key into the matching fields, and click Save Notification Settings.
Now click Send Test Notification. This sends a real push straight to your own admin account's subscribed device(s).
- If you haven't subscribed yet, open your live EchoAI chat as that admin account first and accept the browser's push-permission prompt (via the "Enable Notifications" button in the chat header), then come back and click Test again.
- A green "Sent to N device(s)" message and an actual notification popping up means it's working end-to-end.
- A red error message will tell you exactly what's missing (not enabled, keys not filled in, or no subscribed device yet).
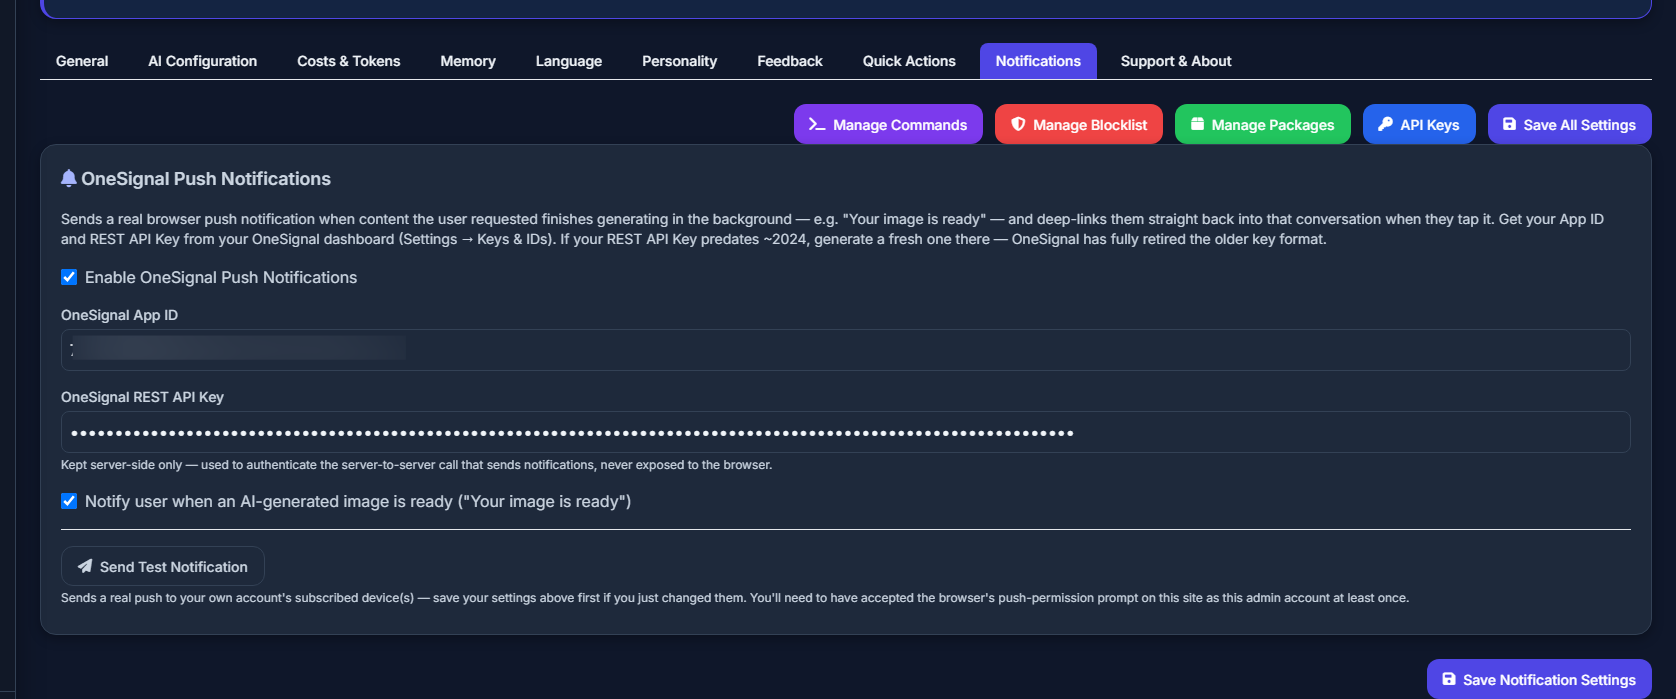
A green "Sent to N device(s)" message from the Test button — followed by an actual notification popping up on your screen — means it's fully working end-to-end. A red error message will tell you exactly what's missing.
Enabling / Disabling the "Image Ready" Notification
On the same Notifications settings page, toggle "Notify user when an AI-generated image is ready". This is on by default once OneSignal itself is enabled.
Push notifications are entirely optional. If you don't configure OneSignal, EchoAI works exactly the same — users just won't get a browser alert when a background image finishes; they'll see it normally next time they check the chat.
Extensions New
EchoAI now supports a powerful Extensions system that lets you expand functionality with plugins and themes.
Navigate to AdminCP of EchoAI → Modules → Extensions to manage everything. From there, you can:
- View – see all installed extensions and their status.
- Get Support – access documentation and support for each extension.
- Buy – purchase premium extensions from the marketplace.
- Install – upload a ZIP file via drag‑and‑drop and it will be installed automatically.
- Pause – temporarily disable an extension without uninstalling.
- Delete – permanently remove an extension.
The system handles both plugins and themes. Users can download a ZIP file from the marketplace or developer, then simply drag and drop it into the Extensions area – the installation is fully automatic.
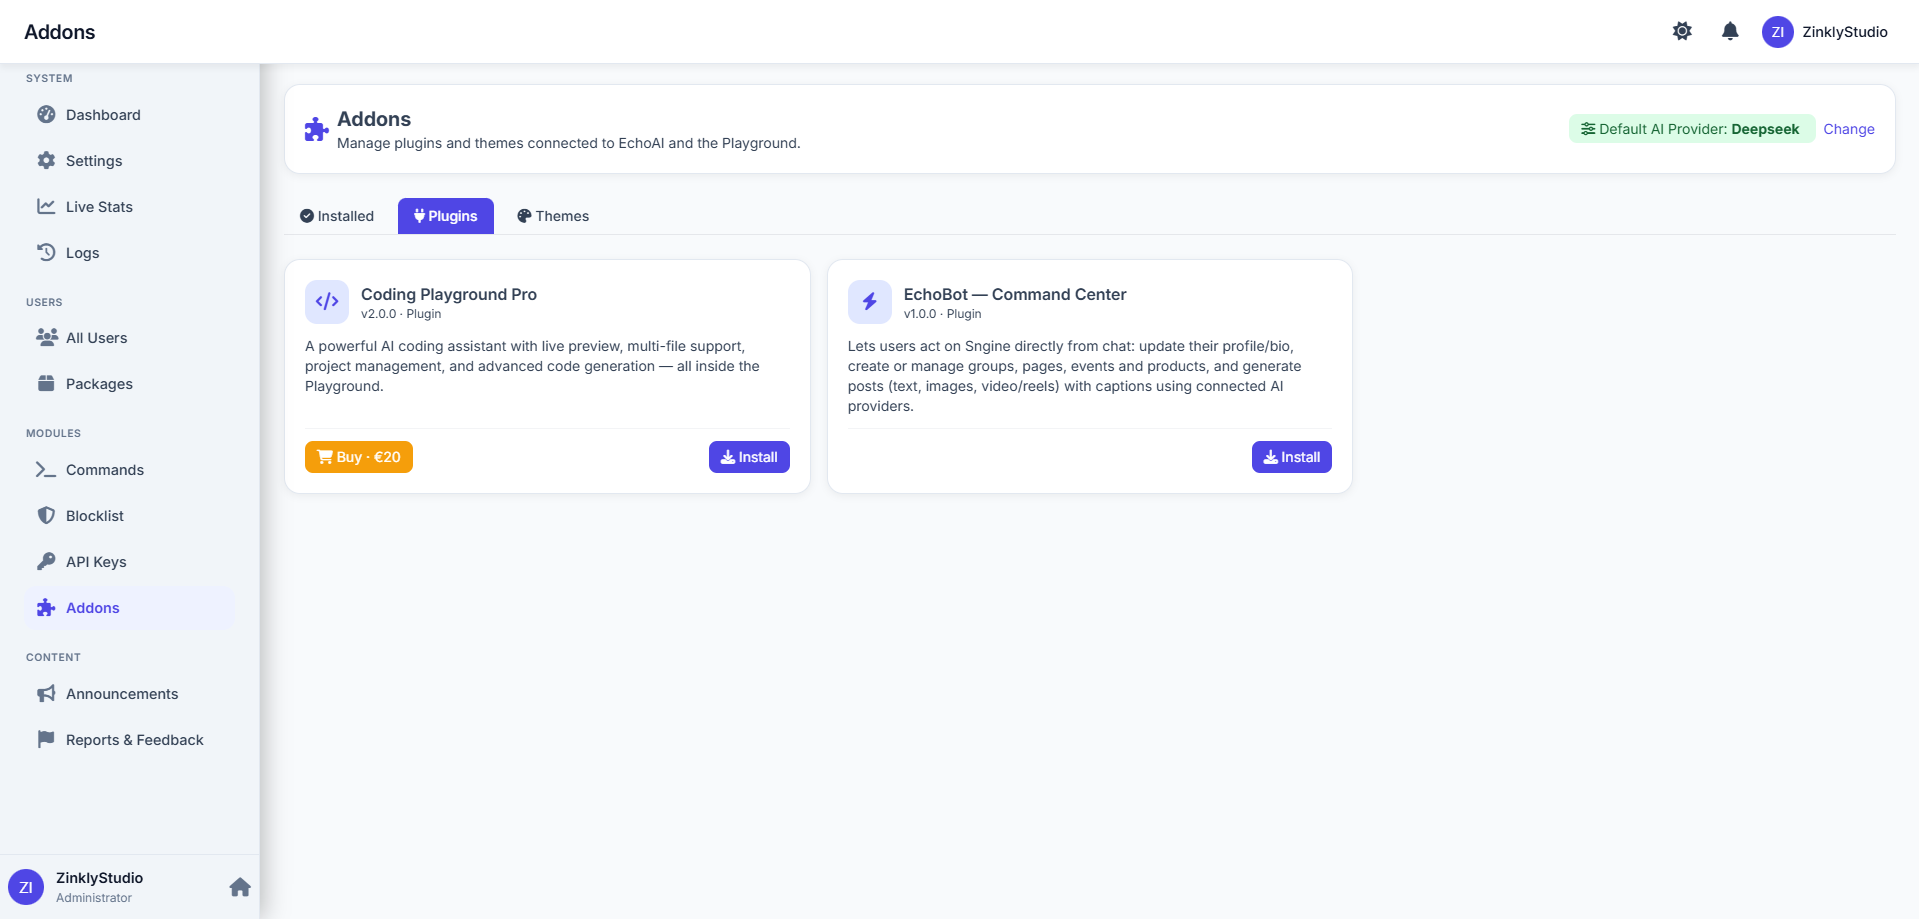
The extension framework is built with well‑documented hooks and APIs, making it easy for developers to create new features or customise the UI without touching the core code.
🤖 EchoBot (Premium Plugin)
Transform your Sngine chat into a powerful command center! With EchoBot, users can effortlessly manage their entire social presence using natural language – no more navigating complex menus.
Buy link: https://portasale.com/items/echobot-command-center-for-sngine-powered-by-echoai/1146
Autonomous Bots New
Beyond running commands for a real logged-in user, EchoBot can now connect to a Sngine Fake Generator account and turn it into a fully autonomous, AI-powered community member — posting, commenting, reacting, messaging, sending/accepting friend requests, and running its own Pages/Groups/Stories entirely on its own, on a schedule you control.
- Per-bot schedule – active days, active hours, and hourly/daily action & AI-request limits, so activity always stays within bounds you set.
- Presence – realistic online/offline cycling, or an "always on" mode.
- Ignore / block list – tell a bot to stop responding to specific users, the same way a real person could.
- Shared-hosting friendly – runs via a self-triggered scheduler that piggybacks on normal site traffic, so no shell/cron access is required; a real crontab entry is supported too if your host offers one, for more consistent timing.
- AI disclosure – every connected bot account carries a persistent marker in its own profile bio (and, optionally, a short tag on the content it generates) so it's always identifiable as AI-operated. This is a deliberate design choice, not a limitation.
- Full AdminCP – a dashboard of every connected bot, a per-bot settings editor, an activity log, a built-in connection/permission test, and a safe uninstall path.
Admin Panel → Addons → EchoBot – connect a Sngine Fake Generator user, then configure its personality, permissions, and schedule from there.
Commands that EchoBot can run:
Profile Commands:
change my bio to [text]update my bio [text]set my about to [text]
Group Commands:
create a group called [name]make a group [name]new group [name]create a group [name] with description [text]create a group [name] category [category] privacy [public/closed/secret]update my group [name](change name, description, category, privacy)edit my group [name]delete my group [name]delete the group [name]remove my group [name]
Page Commands:
create a page called [name]make a page [name]new page [name]create a page [name] with description [text]create a page [name] category [category]update my page [name](change name, description, category, company, website, location)edit my page [name]delete my page [name]delete the page [name]remove my page [name]
Event Commands:
create an event called [name]make an event [name]new event [name]create an event [name] on [date/time] at [location]create an event [name] start [date] end [date] location [place]schedule an event [name] for [date]update my event [name](change name, description, dates, privacy)edit my event [name]delete my event [name]delete the event [name]cancel my event [name]
Product Commands:
create a product called [name]make a product [name]new product [name]add a product [name] priced at [price]create a product [name] price [amount] quantity [number] location [place]list a product [name] for [price]update my product [name](change name, price, quantity, location)edit my product [name]delete my product [name]delete the product [name]remove my product [name]
Post Commands:
post [text]create a post saying [text]publish a post [text]share [text]post to my profile [text]post to my wall [text]
Media Post Commands:
post a photo of [subject]post an image of [subject]post a video of [subject]post a reel about [subject]generate a video about [topic]make me a reel about [topic]post a photo of [subject] with caption [text]post a video of [subject] with caption [text]
Blog Commands:
write a blog about [topic]create a blog about [topic]publish a blog on [topic]new blog post [title]generate a blog about [topic]write a blog about [topic] category [category]write a blog about [topic] length [short/medium/long]write a blog about [topic] with cover image
Content Generation Commands (AI writes, then asks where to publish):
write something about [topic]generate a post about [topic]generate content about [topic]write about [topic]write a blog about [topic](if you don't specify where to publish)generate a post about [topic] with an image
Publishing Target Commands (after generating content):
profilepage [page name]group [group name]post to [page name] pagepost to [group name] group
Friend Commands:
send friend request to [name]add [name] as friendaccept friend request from [name]accept [name]'s friend requestdecline friend request from [name]remove [name] from friendsunfriend [name]
Advanced Commands (specify where to publish directly):
post [text] to my profilepost [text] to page [name]post [text] to group [name]post a photo of [subject] to [page name] pagewrite a blog about [topic] on page [name]write a blog about [topic] on group [name]post [text] to [user name]'s wall
Confirmation Responses:
yes / y / confirm / do it / proceed / go ahead– confirm deleteno / n / cancel / stop / nevermind / never mind– cancel delete
💻 Coding Playground (Free)
A powerful AI coding assistant with live preview, multi-file support, project management, and advanced code generation — all inside the Playground.
Giving ability for users to generate code, full structure code to HTML/CSS/JS, PHP, Python and more.
You can find the addon on Extensions → Plugin → coding-playground
The Coding Playground is available as a free extension. Simply go to AdminCP → Modules → Extensions, locate the Coding Playground plugin, and click Install. Once installed, users will see a new "Playground" option in their EchoAI interface.
Dashboard
The home base for admins – a quick overview of your entire system.
- Total Users – registered users count
- Total Tokens – tokens in circulation
- Text Generations – total AI text requests
- Images Generated – total images created
- AI Commands – number of custom commands
- Blocked Topics – active blocklist entries
Quick action buttons give you one‑click access to Users, Packages, Commands, Blocklist, and Settings.
Users
The user management hub – view, search, and manage all registered accounts.
Actions Available
- Search & Filter – by name, email, status (active/blocked), token balance
- Token Management – add, remove, or set exact token balance
- Block / Unblock – with custom reason
- Clear Memory – remove all AI memories for a user
- Delete Chats – permanently remove all conversations
- View Stats – message count, conversation count, daily/weekly/monthly usage, language preference, memory mode
Packages
Manage your pricing and service tiers – both Sngine subscriptions and EchoAI's own standalone token packages.
Sngine Packages
View and edit AI‑specific settings for each Sngine subscription package:
- Token amount
- Daily / Weekly / Monthly / Hourly limits
- Reset period
- Cost per text, image, file
- Thinking Mode toggle
- Memory limit
EchoAI Standalone Subscriptions New
As of Update 1.3, EchoAI packages no longer have to ride on top of Sngine's own subscription system — you can give any EchoAI package its own price and sell it directly through EchoAI's built-in Payments system (PayPal or the custom bank-transfer provider), completely independent of Sngine.
- Set a Price on any package to make it purchasable directly.
- Link a package to a PayPal Plan ID for automatic recurring billing (see Payments → PayPal for how to create one).
- Leave the price at 0 to keep a package free/manual, exactly as before — nothing changes for packages you don't touch.
- Tokens, limits, reset period, Thinking Mode toggle, and Memory limit all work the same as Sngine-linked packages.
- Bulk token management: refresh, pause, resume, delete.
EchoAI includes a default Free package that you can edit or recreate at any time.
Payments New
As of Update 1.3, EchoAI can accept payment for its own standalone packages directly — without routing through Sngine's subscription system at all. Two providers are supported, and you can enable either one, both, or neither.
Connecting PayPal
PayPal support uses PayPal Subscriptions for automatic recurring billing, plus a webhook so EchoAI is notified the moment a payment succeeds, renews, or a subscription is cancelled — no manual checking required.
- Log in to the PayPal Developer Dashboard and create a new REST API app under Apps & Credentials.
- Choose Sandbox while you're testing, or Live once you're ready to accept real payments — PayPal keeps these completely separate, each with their own Client ID/Secret.
- Copy the app's Client ID and Secret.
- In EchoAI, go to Admin Panel → Payments → Providers, check Enable PayPal, choose the matching Mode (Sandbox/Live), and paste in the Client ID and Secret. Save.
-
Register the webhook — EchoAI shows you the exact webhook URL to use right there on the Payments page (it looks like
https://yourdomain.com/echoai/paypal_webhook.php). In the PayPal Developer Dashboard, open your app, scroll to Webhooks, click Add Webhook, paste that URL, and subscribe to at least these events:BILLING.SUBSCRIPTION.ACTIVATEDBILLING.SUBSCRIPTION.CANCELLEDBILLING.SUBSCRIPTION.EXPIREDBILLING.SUBSCRIPTION.SUSPENDEDPAYMENT.SALE.COMPLETED(recurring renewal payments)
- Create a PayPal Subscription Plan for each package you want to sell (in the PayPal dashboard under Products & Plans), then paste that plan's ID into the matching package's PayPal Plan ID field under Admin Panel → Packages.
- Decide on Auto-approve & renew on PayPal subscription success — with this on, a successful PayPal payment upgrades the user's package immediately and automatically; with it off, successful payments still land in Admin Panel → Payments → Providers for you to review before approving.
Always run through a full purchase in Sandbox mode with a PayPal sandbox test account before flipping to Live. Sandbox and Live use entirely different credentials and webhook subscriptions.
How the Custom (Bank Transfer) Provider Works
The Custom provider is a manual, receipt-based flow for admins who want to accept bank transfers, local payment apps, or any method PayPal doesn't cover — no third-party integration or API keys required.
- Go to Admin Panel → Payments → Providers and check Enable Custom Payment.
- Fill in your bank details: Bank Name, Account Holder, IBAN, SWIFT/BIC, and Country — these are shown to the user when they choose to pay this way.
- Write clear Payment Instructions (e.g. "Transfer the exact package amount, then upload your receipt below. Approval usually takes 24 hours.") — this is shown alongside your bank details.
- Under the Settings tab, set the allowed receipt file types (defaults to
pdf, jpg, jpeg, png) and the max receipt file size in MB. - Save. Users choosing this method will see your bank details and instructions, transfer the money on their own, then upload a receipt (PDF or image) for you to review.
Unlike PayPal, a Custom-provider payment always waits in the queue for you to approve or decline — there's no way to fake a bank transfer receipt into an instant approval.
Reviewing & Approving Payments
Every payment attempt — PayPal or Custom — lands in Admin Panel → Payments → Providers, in the Payment Submissions table.
- Filter by status: pending approved declined active cancelled expired.
- For Custom-provider submissions, click View to open the uploaded receipt in a new tab before deciding.
- Approve — instantly upgrades the user to that package.
- Decline — you can attach a short note explaining why, which the user can see.
The dashboard at the top of the Payments page shows running totals for pending, approved, and declined submissions, plus total revenue.
AI Management New
Fine‑tune the AI's behaviour and capabilities.
Commands
Create custom slash commands (e.g., /help, /summarize) that users can type to trigger specific AI responses. Each command can have its own system prompt.
Blocklist
Add forbidden words or phrases. If a user's message contains a blocked word, the request is rejected with a custom response.
API Keys
Manage your DeepSeek and OpenAI API keys, including the new GPT-5.6 model family (Sol, Terra, and Luna versions). Test each key with a single click to verify it's working.
Scope Restriction New
The opposite of the Blocklist: instead of listing what's forbidden, list exactly what the assistant is allowed to talk about (e.g. a specific game, product, or service). Turn on Strict Scope Mode and add one or more allowed topics – every message is then classified against that list by a real AI call before it's answered, not just keyword matching, so ordinary phrasing that never says the topic's name by name still gets recognised correctly. Greetings and questions about the assistant itself always stay allowed. If no API key is configured yet, or the classifier call fails for any reason, Scope Restriction fails open – it never locks users out due to a transient error.
A community site for a single game can add that game as its only topic, so the assistant politely declines unrelated small talk and stays focused on what your community actually needs help with.
Hero / Unit Combos New
Built for gaming communities. Enter a combo (a set of unit or hero names, plus your own description of how they work together), and whenever a user's message mentions any of those names, that combo's description is automatically pulled into the AI's context as verified data – so it answers with your team's actual, tested pairing instead of an AI-invented one that only sounds plausible.
Troop / Unit Calculator New
Also built for gaming communities that manage resource-based progression (training or upgrading units/troops using in-game resources). Enter the real cost to train or upgrade each level (up to 4 configurable resource types – not locked to any specific game's terminology), and a player can ask something like "I have 1M mana, 800k ore, 500k wood, and 2M stone – how many level V troops can I train?" and get an exact number back. The arithmetic is always computed by EchoAI's own code from your configured costs – never left to the AI to calculate – so the answer is exact every time, including which resource is the limiting factor.
Both Hero/Unit Combos and the Troop Calculator only answer once an admin has entered real data. Until then, the assistant will say so plainly rather than guessing.
Content
Tools for communicating with your users and collecting feedback.
Announcements
Send global news, maintenance alerts, or feature updates to all users. Announcements appear as in‑app notifications.
Reports & Feedback
View user‑submitted reports and feedback. Mark them as resolved, reply, or take action (e.g., ban a user).
System
Core configuration and technical administration.
Settings
The central configuration panel. Adjust everything from the AI name and avatar to pricing models, memory limits, and feature toggles.
- General – AI brand name, avatar icon, system prompt, default language
- AI Configuration – default API providers, model selection, temperature
- Costs & Tokens – pricing model, token costs, thinking mode cost
- Memory – context window size, max memory entries
- Language – allow users to change language
- Personality – enable personality system, select allowed packages
- Feedback – disable like/dislike, copy, or report buttons
- Social Post Search – enable/disable AI search for Sngine posts
- Notifications – configure OneSignal push notifications, see Push Notifications
Live Stats
Real‑time monitoring: online users, today's activity, token usage trends, device breakdown, top users, and feedback statistics.
Logs
Historical record of admin actions – every settings change, user block, token adjustment, and more, logged with IP and user agent for security auditing. Update 1.3 adds a dedicated Error Log alongside the admin action log, so you can see server-side errors (failed API calls, database issues, etc.) without needing shell/FTP access to your host's raw PHP error log.
Cron Jobs
EchoAI relies on a daily cron job to reset user tokens and usage counters. This is essential for the token system to work correctly.
The Cron Command
Add this to your server's crontab (e.g., via HestiaCP, cPanel, or crontab -e):
0 0 * * * php /home/user/web/yourdomain.com/public_html/echoai/cron/reset_tokens.php >> /home/user/logs/echoai_reset.log 2>&1What It Does
- Checks every user's
last_resettimestamp against their package'sreset_period(daily, weekly, or monthly). - If the period has passed, it resets the token balance to the package's token amount and sets usage counters to 0.
- Updates
last_resetto the current time.
The cron job must run daily for the token system to function correctly. Without it, users will not receive their periodic token allowances.
Other Cron Jobs
If you've enabled EchoAI's standalone Payments system, also add the payment cron job — it checks pending PayPal subscriptions and handles renewal bookkeeping between webhook calls:
*/30 * * * * php /home/user/web/yourdomain.com/public_html/echoai/cron/payment_cron.php >> /home/user/logs/echoai_payment.log 2>&1Testing a Cron Job
You can run any of these scripts manually to test them:
php /home/user/web/yourdomain.com/public_html/echoai/cron/reset_tokens.phpIf you see output like Completed. X users had their tokens reset., it's working.
Updating EchoAI
Keeping EchoAI up‑to‑date ensures you have the latest features, bug fixes, and security patches. This guide covers the manual update process – an automatic updater is in development.
Always create a full backup of your Sngine database and EchoAI database before performing any update. This protects your data in case something goes wrong.
📦 Manual Update Process (Recommended)
This is the only method currently available – it gives you full control and is the safest way to update.
- Download the latest version – Obtain the new EchoAI ZIP package (e.g.,
EchoAI_v1.4.zip) from the marketplace or your purchase email. - Extract the Update folder – Inside the ZIP, locate the
Updatefolder. This folder contains all files that have changed since the previous version — it mirrors the exact folder structure of your live install, so every file already tells you where it belongs. - Check for SQL updates – Inside the
Updatefolder, look for one or more.sqlfiles. Note: not every update includes one — some updates only modify PHP files. If a SQL file is present, proceed to step 4; otherwise, skip to step 5. These SQL files are written to be safe to run more than once (they check whether a column/table already exists before adding it), so re-running one by mistake won't break anything. - Apply the SQL changes – Log in to your database management tool (e.g., phpMyAdmin), select your EchoAI database, open the SQL tab, and paste in the contents of each
.sqlfile (or use the Import feature). This adds any new tables or columns required for the update's features. - Replace the updated files – Copy the contents of the
Updatefolder to your server's EchoAI installation directory (e.g.,/public_html/echoai/), preserving the folder structure. Important: Do not delete or overwrite entire folders — only copy the individual files from the Update folder into their corresponding locations. For example, if the Update folder containsadmin/settings.php, replace only that one file, not your entireadmin/folder. Replacing entire folders can corrupt your installation, wipe custom edits, or cause missing-file errors. - Clear every layer of cache – this is the single most common reason an update "doesn't seem to have installed":
- Browser cache — hard refresh with
Ctrl+Shift+R(Windows/Linux) orCmd+Shift+R(Mac). - Server-side PHP OPcache — many hosts cache compiled PHP and won't pick up a changed file instantly. Restart PHP-FPM if you have shell access, or use your host's "Restart PHP" / "Select PHP Version" control panel button, which typically forces a reset.
- CDN or full-page cache — if you use Cloudflare, LiteSpeed Cache, or similar, purge the cache for your domain.
- Browser cache — hard refresh with
The manual method ensures that you only update what has changed, minimising the risk of accidentally deleting customised files or breaking integrations.
Note: An automatic update feature is currently in development and will be available in future releases. For now, please use the manual process described above.
Before any update, export both databases using phpMyAdmin or your preferred tool. This allows you to restore if something unexpected happens.
🔄 Post‑Update Verification Checklist
Don't just assume an update landed — confirm it, in this order:
- Confirm the files actually changed — open one of the updated files directly on the server (via File Manager) and check the content matches what you expect, rather than trusting the upload alone.
- Hard refresh and re-test the specific feature the update was about, not just "does the chat still load."
- Check Admin → Error Logs for anything new right after the update — this surfaces problems (like a missing SQL step) far faster than waiting for a user to report them.
- Verify the token system and cron jobs still run correctly — an update that touches the database occasionally needs the cron job to run once before everything settles.
- If something still looks wrong after all of the above, check the FAQ or contact support with the exact update version and what you're seeing.
Changelog
All notable changes to EchoAI are documented here.
Update 1.4 – September 4, 2026
- Added Scope Restriction — confine the assistant to specific allowed topics using a real AI classification call
- Added Hero / Unit Combos — ground gaming-community tactical questions in admin-curated pairing data instead of AI guesses
- Added Troop / Unit Calculator — exact, server-computed resource training/upgrade answers for gaming communities, never left to the AI to calculate
- Added Time-zone conversion — EchoAI now actually uses each user's detected browser time zone to answer "what time is X for me" questions with a real computed time, instead of leaving it unused
- Added Video Analysis — the AI can now analyse an uploaded video and respond about its contents, alongside the existing image recognition
- Added Feedback Buttons
- Added AI-powered info / bug-fixing system in AdminCP
- Added BYOK — Bring Your Own Key: users can set up their own OpenAI/DeepSeek API key and use EchoAI without your platform's usage limits
- Added Telegram announcement bot system
- Added Ability for Personality users to create Custom Personas
- Added Ability for Personality users to create / replace Quick Action modification
- Added AI timestamps — the current time and day are now included in AI responses
- Added Search features on AdminCP
- Revamped Coding Playground Pro — responsive layout, theme-matched dark/light design, syntax highlighting, and a properly sandboxed live preview
- Revamped Error Log system in AdminCP — improved for support use
- Fixed A bug where the AI could receive a user's own message duplicated as two consecutive turns, causing it to falsely claim "you typed that twice" — including on the very first message of a brand-new conversation
- Fixed A crash in a background media-cleanup routine that could take down every page load if the database's legacy files table didn't have the exact expected column names — now uses the correct columns and can no longer bring down the site even if a future mismatch occurs
- Fixed The Sngine Site URL setting being hardcoded at install time with no way to change it afterward except direct database access — it now has its own editable field in Admin → Settings
- Fixed A conversation's Pin/Edit/Delete controls in the chat sidebar staying stuck open instead of only appearing on hover or via a small dedicated button
Update 1.3 – August 21, 2026
- Added Support for OpenAI GPT-5.6 (Sol, Terra, and Luna versions)
- Added Ability for admins to create custom subscriptions through EchoAI itself, independent of Sngine
- Added Ability for admins to enable a payment provider — PayPal or a custom provider — inside EchoAI
- Added Ability for users to share a conversation
- Added Ability for Personality users to change their Quick Actions
- Added Ability for Personality users to replace a Quick Action
- Added Ability for admins to add a custom subscription with or without Sngine (requires the Extended add-on)
- Added OneSignal push notification when an image finishes generating
- Added A "Send Test Notification" button in Admin → Settings → Notifications, so OneSignal setup can be verified with one click instead of guessing
- Added More capabilities to the Coding Playground
- Added Ability to auto-delete files / chats / folders after a set time (e.g. 1 week)
- Added Timestamps so the AI is aware of time — the current time and day are now included in the AI's responses
- Added Ability for users to collapse/expand the Recent Chats section
- Added Error Log on AdminCP
- Added Stop Generating button
- Added Day-level (year/month/day) folder organisation for AI-generated images, so a specific day's images can be found without opening every file in the month
- Added Automatic, self-healing database checks that repair a small number of known misconfigured columns on older installs without any manual SQL
- Revamped The upload experience — attaching an image or file now stages it as a small preview above the message box instead of posting it immediately, so you can add a caption (or send it as-is) before it's actually sent
- Revamped The Library modal — pill-style tabs, refined card styling, and clearer empty states
- Revamped The "generating an image" progress indicator with a clearer animated design
- Modified The core of EchoBot to be smarter
- Modified The core of the Coding Playground for better code quality and more features
- Fixed User avatars rendering as squares instead of circles
- Fixed AI response speed issues
- Fixed Issue pinging/testing APIs from Admin Panel → API Keys
- Fixed A "Table 'sessions' doesn't exist" error
- Fixed A "Memory: No facts extracted from conversation" error
- Fixed A "Memory: Auto-save triggered" error
- Fixed An HTTP 500 error when opening a new chat immediately after receiving a response
- Fixed Library modal tabs (All / Images / Files / Playground) collapsing into an invisible sliver instead of showing normally
- Fixed Playground "Open" and delete buttons rendering with the browser's unstyled default look instead of matching the rest of the UI
- Fixed AI-generated images and uploaded files failing to save or display (404) when EchoAI is installed in a subdirectory rather than the site root
- Fixed Generated images not actually being written to disk on hosts with
allow_url_fopendisabled — a very common shared-hosting restriction - Fixed Uploading a file or image immediately posting it to the conversation with no way to add a caption or cancel
- Fixed The chat losing scroll position / feeling "stuck" right after uploading an image
- Fixed Two separate database errors ("Unknown column" / "doesn't have a default value") that could occur on file upload on certain older installs
- Fixed OneSignal push notifications silently failing because of a retired OneSignal API endpoint and authentication method
Update 1.2 – July 17, 2026
- Added New Library System for managing Files and Images
- Added New Playground System for advanced AI testing and interactions
- Added New Coding Playground Plugin (FREE) for code editing and live preview
- Added New EchoBOT - Interface with yout Sngine (PREMIUM) addon
- Added Ability for users to upload files and use the File Scan feature
- Added Ability for users to import conversations from other AI platforms
- Added Ability for admins to set file limits per package
- Added Ability for admins to enable / disable the File Scan feature
- Added Password Protection for Files (users can add a lock password when creating files)
- Added Delete Options: Delete All Chats, Delete All Folders, Delete Chats Only, Delete Folders Only
- Added Download Options: Download All Chats, Download All Folders, Download Chats Only, Download Folders Only
- Fixed Improved file management stability
- Fixed Improved library system performance
- Fixed Various minor UI and system improvements
Update 1.1.1 – July 6, 2026
- Added Ability for admins to Enable / Disable Thinking Mode
- Added Ability for admins to set limit per package about Memory code
- Added Ability for admins to reset via Cron Jobs automatically or manual the Memories
- Added Ability for admins to track Memory Statistics
- Added Memory Settings on User Menu
- Added Live Thinking Mode
- Fixed Thinking Mode issue
- Fixed Memory Issue
- Fixed Issues with ghost typing-cursor-dot
- Revamped Thinking Mode Button collapse / open
- Revamped Design of Thinking Mode messages / answers
- Modified Documentations
- Modified English, Greek, German and Brazil Languages
- Removed Ghost typing-cursor-dot
Update 1.1 – July 5, 2025
- Added New Ability for changes to be saved on Database and not hardcoded
- Added Ability for users to Pin and Unpin Conversations
- Added Ability for admins to set custom filename on Download (Uploads Prefix)
- Added Ability for users to view all Image Generators (Gallery System Added)
- Added Ability for admins to swap between Light and Dark Mode on AdminCP
- Added Ability for users to create Conversation Folders
- Added Ability for users to search posts from Sngine from the AI interface (e.g., "Posts about PlayStation 5?")
- Added Ability for admins to add Custom Boxes and show them to users under Settings > Support & About
- Added Brazil Language
- Revamped User Sidebar on Mobile and Desktop (Menu)
- Fixed Issue deleting Custom Buttons from AdminCP
- Fixed AI Name Position on Mobiles
- Fixed AI Texts on Send Button area on Mobiles was cutting off
- Fixed AdminCP button on EchoAI interface
- Fixed AI Response Bubble Alignment
- Fixed Avatar Alignment issues
- Fixed Bubble Styling issues
- Fixed Action Buttons issues
- Updated Documentations
- Updated Greek Languages
- Updated German Language
- Removed Update Tab Removed
Update 1.0.1 – June 23, 2026
- Fixed an issue where editing packages could trigger a "User Not Found" error.
- Fixed several buttons that were not displaying properly on mobile devices.
- Fixed the AdminCP desktop navigation menu being cut off.
- Fixed broken buttons and layout boxes in the mobile user menu.
Update 1.0 – June 22, 2026
- Added Complete AI chat interface.
- Added OpenAI and DeepSeek integration.
- Added AI image generation.
- Added Personality system.
- Added Token system.
- Added Memory system.
- Added Commands system.
- Added User settings center.
- Added Powerful AdminCP.
- Added Analytics dashboard.
- Added Multi-language support.
Frequently Asked Questions
Quick answers to the most common questions about EchoAI.
No. EchoAI is designed as a standalone module that integrates with Sngine's existing user system without modifying any core files. It uses Sngine's authentication and database connections while keeping everything else self-contained.
You need at least a DeepSeek or OpenAI API key for the AI to work. Both providers offer free trial credits to get started. You can sign up at:
Go to Admin Panel → Settings → General and update the AI Brand Name and AI Avatar Icon fields. You can also upload a custom avatar image directly in the settings panel.
Yes – the token system is designed for monetisation. You can integrate payment gateways via Sngine's native package system, or use EchoAI's own standalone Payments system (PayPal or bank transfer) to sell EchoAI packages directly, independent of Sngine.
Yes. EchoAI includes a default Free package that you can customise or recreate at any time from the Packages section. You can control how many free tokens users get and how often they reset.
Enable it globally in Settings → Costs & Tokens, then enable it for specific packages in Packages. Users with a package that has Thinking Mode enabled will see the option in their chat interface.
Users will not receive their token resets. Check the cron log file for errors and ensure the command path is correct. You can also run the script manually to test it – see the Cron Jobs section for details.
Navigate to https://yourdomain.com/echoai/installation.php and click the 🗑️ Reset & Begin Fresh button. This will wipe all EchoAI data (including database tables) and allow you to start over from scratch. Important: This is irreversible – make a backup first!
Yes – EchoAI works with any Sngine-compatible theme. If you face issues with default icons and the AI cannot show them, update the avatar path in /echoai/index.php around line 251 to point to your active theme's images folder. This ensures the AI avatar displays correctly.
Use the Send Test Notification button in Admin → Settings → Notifications first — it will tell you exactly what's wrong (OneSignal disabled, missing keys, or no subscribed device on your account yet). The most common cause is an outdated OneSignal REST API Key; generate a fresh one from your OneSignal dashboard's Keys & IDs page. See the full Push Notifications guide.
Contact our support team at zinkly.org/contacts – we're happy to help. Please include your purchase ID and a detailed description of your issue for faster assistance.
Contact our support team at zinkly.org/contacts – we're happy to help.